Ultimate Fluffy Snickerdoodle Rolls: A Brown Butter & Chocolate Dream
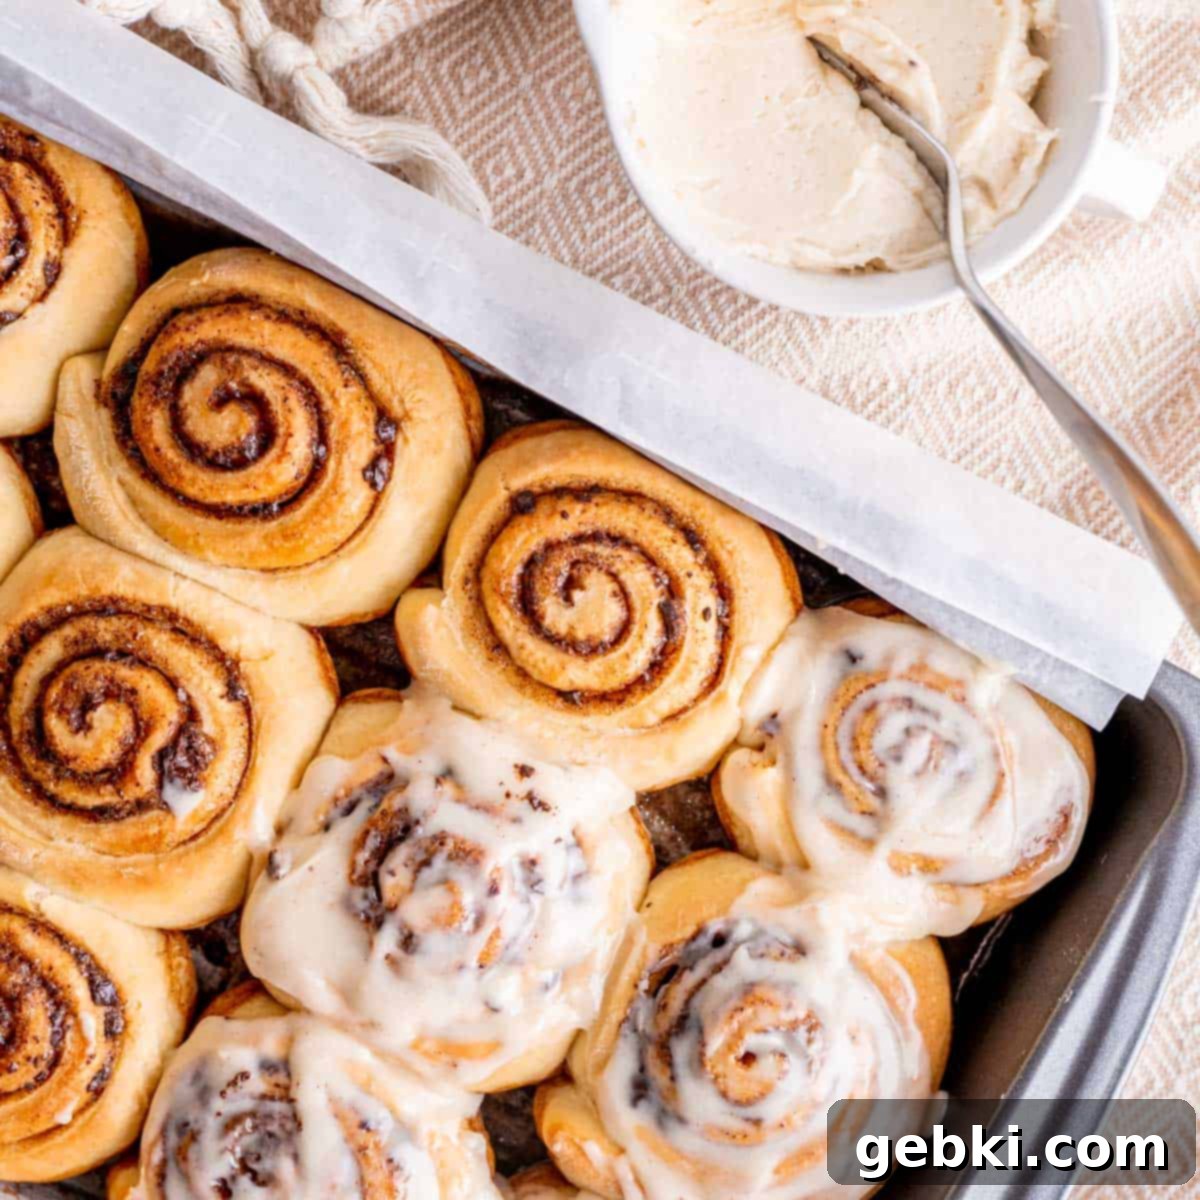
Prepare for an extraordinary treat that will redefine your breakfast and brunch expectations: these Snickerdoodle Rolls are truly better than your average cinnamon rolls! Imagine soft, pillowy dough generously swirled with a decadent filling of warm brown butter, fragrant cinnamon, aromatic cardamom, and delightful bits of your favorite chocolate bar. This isn’t just a pastry; it’s an experience, a symphony of the warmest flavors wrapped in the coziest embrace, perfect for any special occasion or a comforting weekend morning.
Whether you’re hosting a festive holiday brunch with friends and family or simply craving something sweet and satisfying, these Snickerdoodle Rolls are an absolute winner. The best part? You can prepare them the night before, allowing you to wake up to the wonderful aroma of freshly baked rolls with minimal effort in the morning. This make-ahead option makes them an ideal choice for busy holiday seasons or when you want to impress without the morning rush.
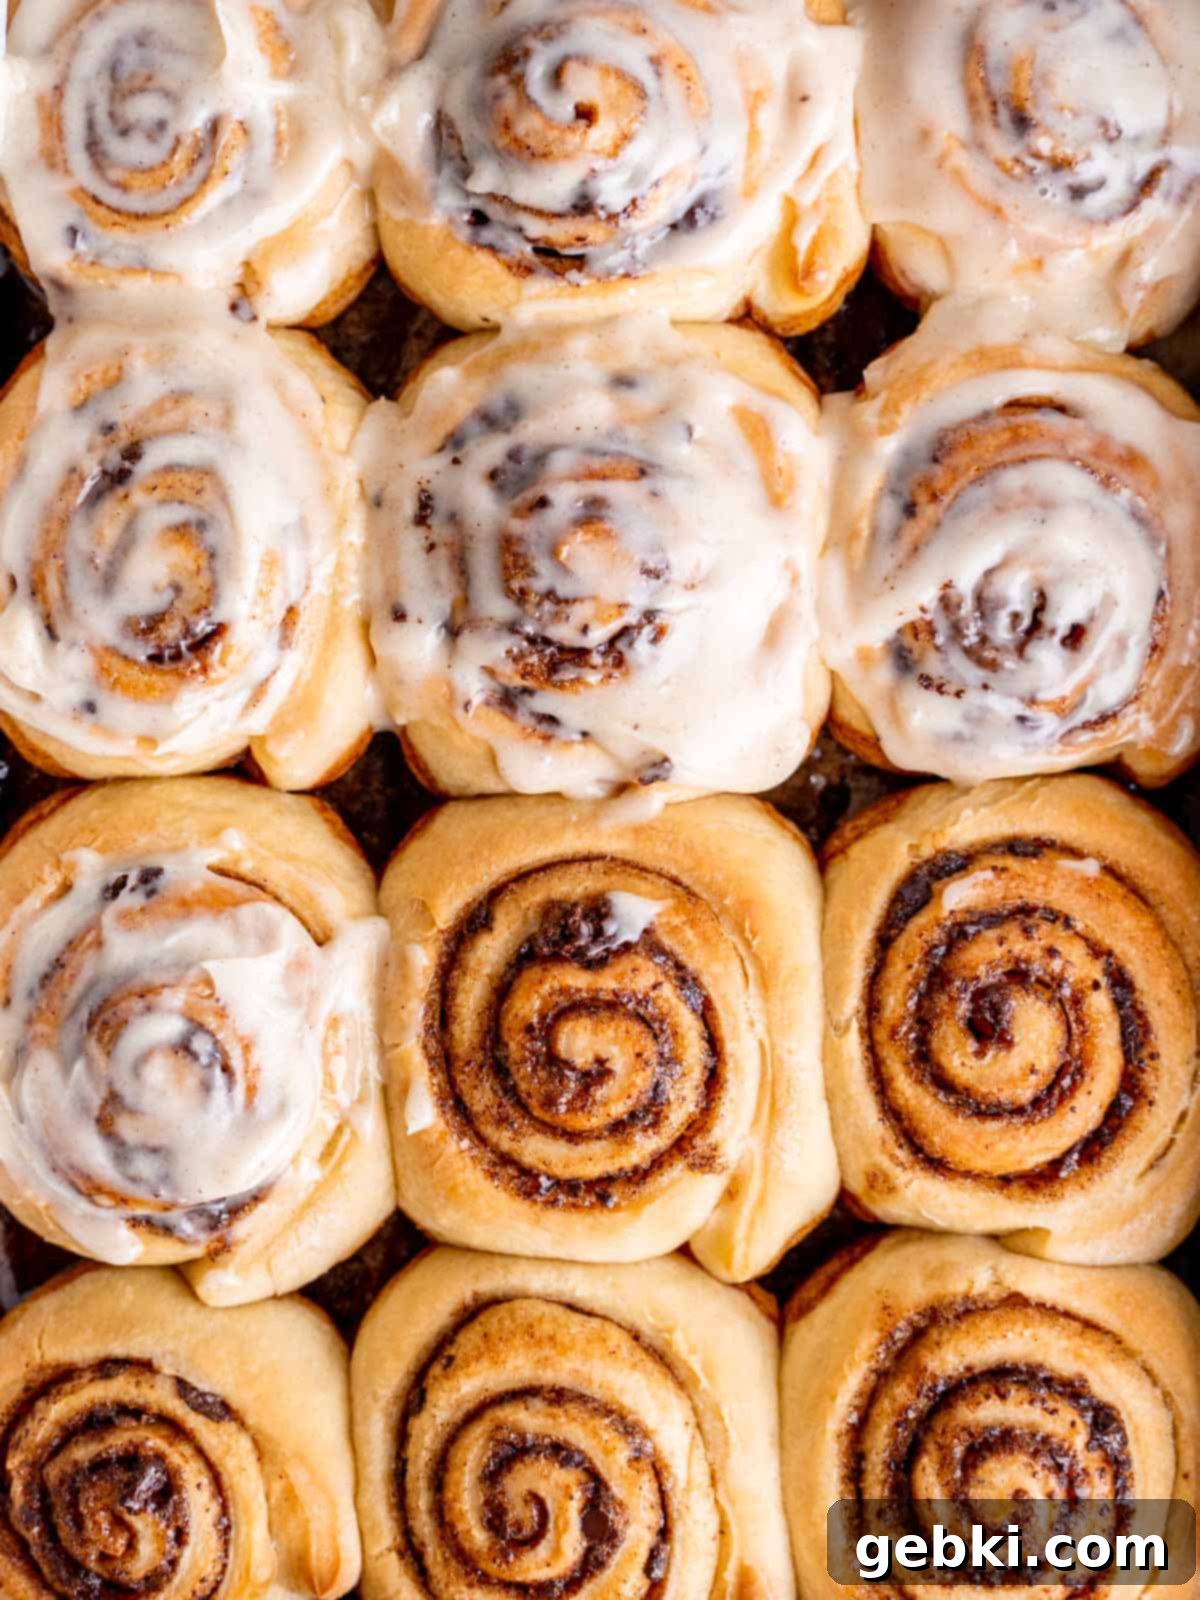
As the creator of these delightful rolls, I drew inspiration from one of my most beloved and popular creations: my snickerdoodle cookies. It felt like a natural evolution to transform their iconic chewy texture and spiced flavor into a rich, yeasted roll. Initially, the idea of making cinnamon rolls was quite daunting. The process seemed overwhelmingly complex, especially with the use of yeast, which many home bakers find intimidating. However, after my very first attempt, all my apprehension vanished.
I consider myself a visual and hands-on learner, so I understand the importance of clear guidance. That’s why I’ve meticulously put together a detailed photo tutorial within this recipe. My goal is to demystify the process and show you just how simple and enjoyable making these magnificent rolls can be. You’ll be a yeast baking pro in no time!
There’s nothing quite like waking up to the irresistible aroma of these Snickerdoodle Rolls on Christmas morning – they’ve become a cherished tradition in my home! For those looking to explore more cozy and delicious Holiday brunch and dessert recipes, be sure to check out my Gingerbread Brownies, Almond Butter Blossoms, or Cinnamon Roll Donuts! These recipes are sure to bring warmth and joy to any festive gathering.
Why You’ll Adore This Snickerdoodle Roll Recipe
These Snickerdoodle Rolls aren’t just another sweet treat; they are a culinary experience designed to bring joy and comfort. Here’s why this recipe will quickly become a cherished favorite in your home:
- Unforgettable Flavor Fusion: We’ve taken the classic snickerdoodle profile—warm cinnamon and a hint of tang—and elevated it with rich brown butter and the unexpected delight of your favorite chocolate bar. The cardamom adds a sophisticated, aromatic twist that sets these rolls apart.
- Perfectly Pillowy Texture: Each bite promises an incredibly soft and fluffy dough, light as air, that melts in your mouth. The secret lies in precise temperature control and proper kneading, ensuring a perfectly risen dough every time.
- Ideal for Any Occasion: From a casual weekend brunch to a grand holiday feast, these rolls are versatile. Their comforting flavors make them a hit for Christmas, Easter, or any special gathering where you want to serve something truly memorable.
- Convenient Make-Ahead Option: Reduce morning stress by preparing these rolls the night before. Simply assemble, refrigerate, and then bake fresh in the morning. This feature is a game-changer for entertaining or enjoying a leisurely start to your day.
- Visually Stunning: The beautiful swirls of cinnamon-sugar and the glistening cream cheese icing make these rolls as appealing to the eyes as they are to the palate. They’re sure to be a showstopper on any table.
Essential Ingredients for Your Snickerdoodle Rolls
Crafting these heavenly Snickerdoodle Rolls requires a selection of high-quality ingredients, each playing a crucial role in achieving that perfect taste and texture. Don’t skip on quality, as fresh ingredients make a noticeable difference!
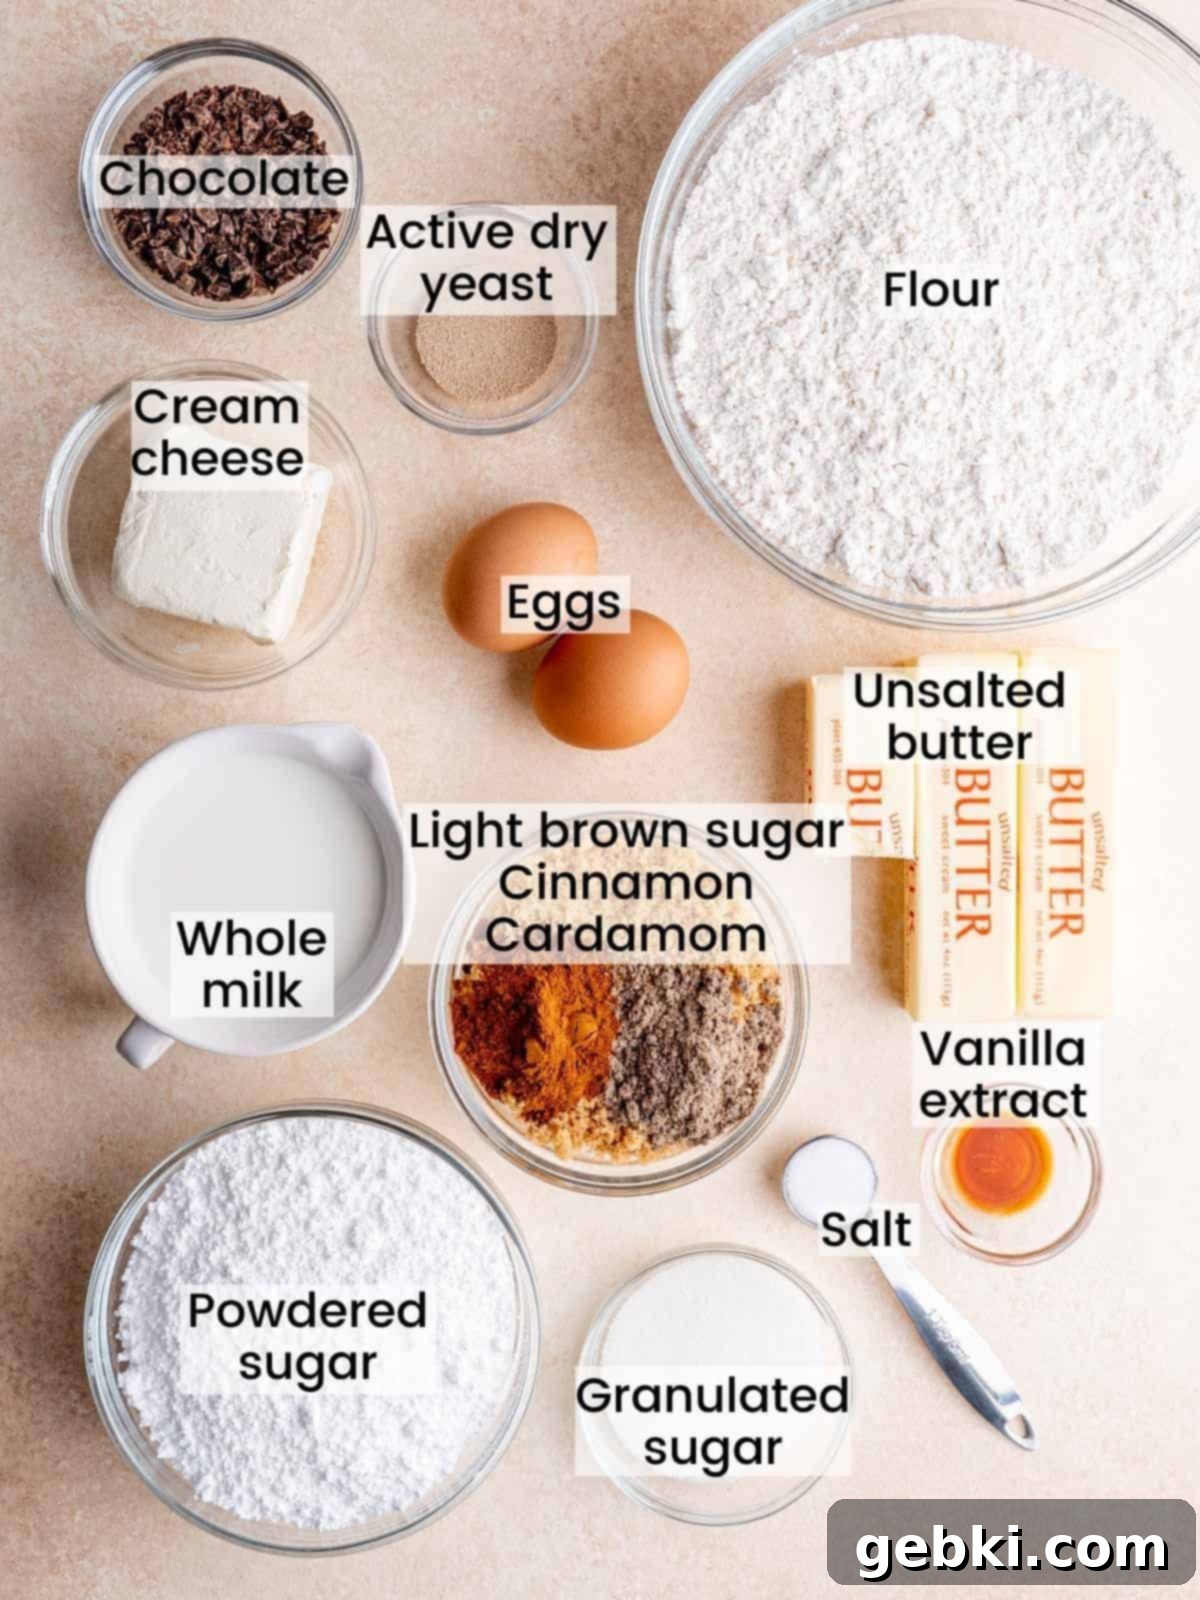
- Granulated Sugar: For sweetness in the dough and activating the yeast.
- Active Dry Yeast: The magic ingredient for those soft, fluffy rolls. Ensure it’s fresh and active!
- All-Purpose Flour: The foundation of our dough. Using a food scale for accuracy will yield the best results.
- Vanilla Extract: Enhances all the sweet and warm flavors in both the dough and the icing.
- Salt: Balances the sweetness and strengthens the gluten structure in the dough.
- Eggs: Add richness, moisture, and help with the dough’s structure. Room temperature eggs are key for even mixing.
- Unsalted Butter: Used generously in the dough, for browning in the filling, and in the luscious cream cheese icing. Unsalted allows you to control the salt content.
- Whole Milk: Provides richness and activates the yeast. Bring it to the correct temperature to ensure yeast activity.
- Light Brown Sugar: The star of the filling, adding depth and a caramelly sweetness when combined with brown butter.
- Cinnamon: The quintessential snickerdoodle spice, providing warmth and classic flavor.
- Cardamom: A subtle yet transformative spice that adds an aromatic, slightly citrusy, and floral note, elevating the entire flavor profile.
- Chocolate Bar: This is where you can truly customize! Choose your favorite – milk, dark, toffee, almond – for delightful pockets of melted chocolate within the rolls.
- Cream Cheese: The base for our irresistibly tangy and sweet icing. Ensure it’s at room temperature for a smooth consistency.
- Powdered Sugar: For the perfectly smooth and sweet cream cheese icing.
See the comprehensive recipe card below for exact quantities and measurements.
Essential Equipment for Perfect Snickerdoodle Rolls
Having the right tools can make all the difference in your baking experience, especially when working with yeasted doughs. Here’s a list of recommended equipment that will help you achieve perfect Snickerdoodle Rolls with ease:
- A stand mixer with a hook attachment is highly recommended for making the dough. It takes the hard work out of kneading, ensuring a consistently smooth and elastic dough. If you don’t have one, don’t worry! You can absolutely knead the dough by hand; it just requires a bit more arm power and time.
- A kitchen thermometer is your best friend when working with yeast. It helps you accurately measure the temperature of the milk mixture before adding the yeast. This is crucial because if the temperature is too low, the yeast won’t activate properly, and your dough won’t rise. If it’s too high, it will kill the yeast, rendering it inactive. Aim for 105-110°F (40-43°C) for optimal activation.
- Large mixing bowls: You’ll need at least one for the dough and another for preparing the icing and filling.
- Small saucepan: For boiling the milk and browning the butter.
- Whisk: For combining wet ingredients and ensuring a smooth icing.
- Rolling pin: To evenly roll out your dough into a rectangle.
- 9×13 inch baking pan: The perfect size to snugly fit all 12 rolls for baking.
- Parchment paper: Lines the baking pan for easy cleanup and prevents sticking.
- Sharp knife or unflavored dental floss: For cleanly cutting the rolls without squishing the beautiful swirls. Dental floss is often preferred for maintaining shape!
- Cutting board: A stable surface for chopping chocolate and slicing rolls.
- Measuring cups and spoons: Essential for accurate ingredient measurements (though a kitchen scale is preferred for dry ingredients like flour).
Crafting Your Snickerdoodle Rolls: A Detailed Guide
Follow these precise steps to create perfectly soft, flavorful Snickerdoodle Rolls. Pay close attention to temperatures and dough consistency for the best results!
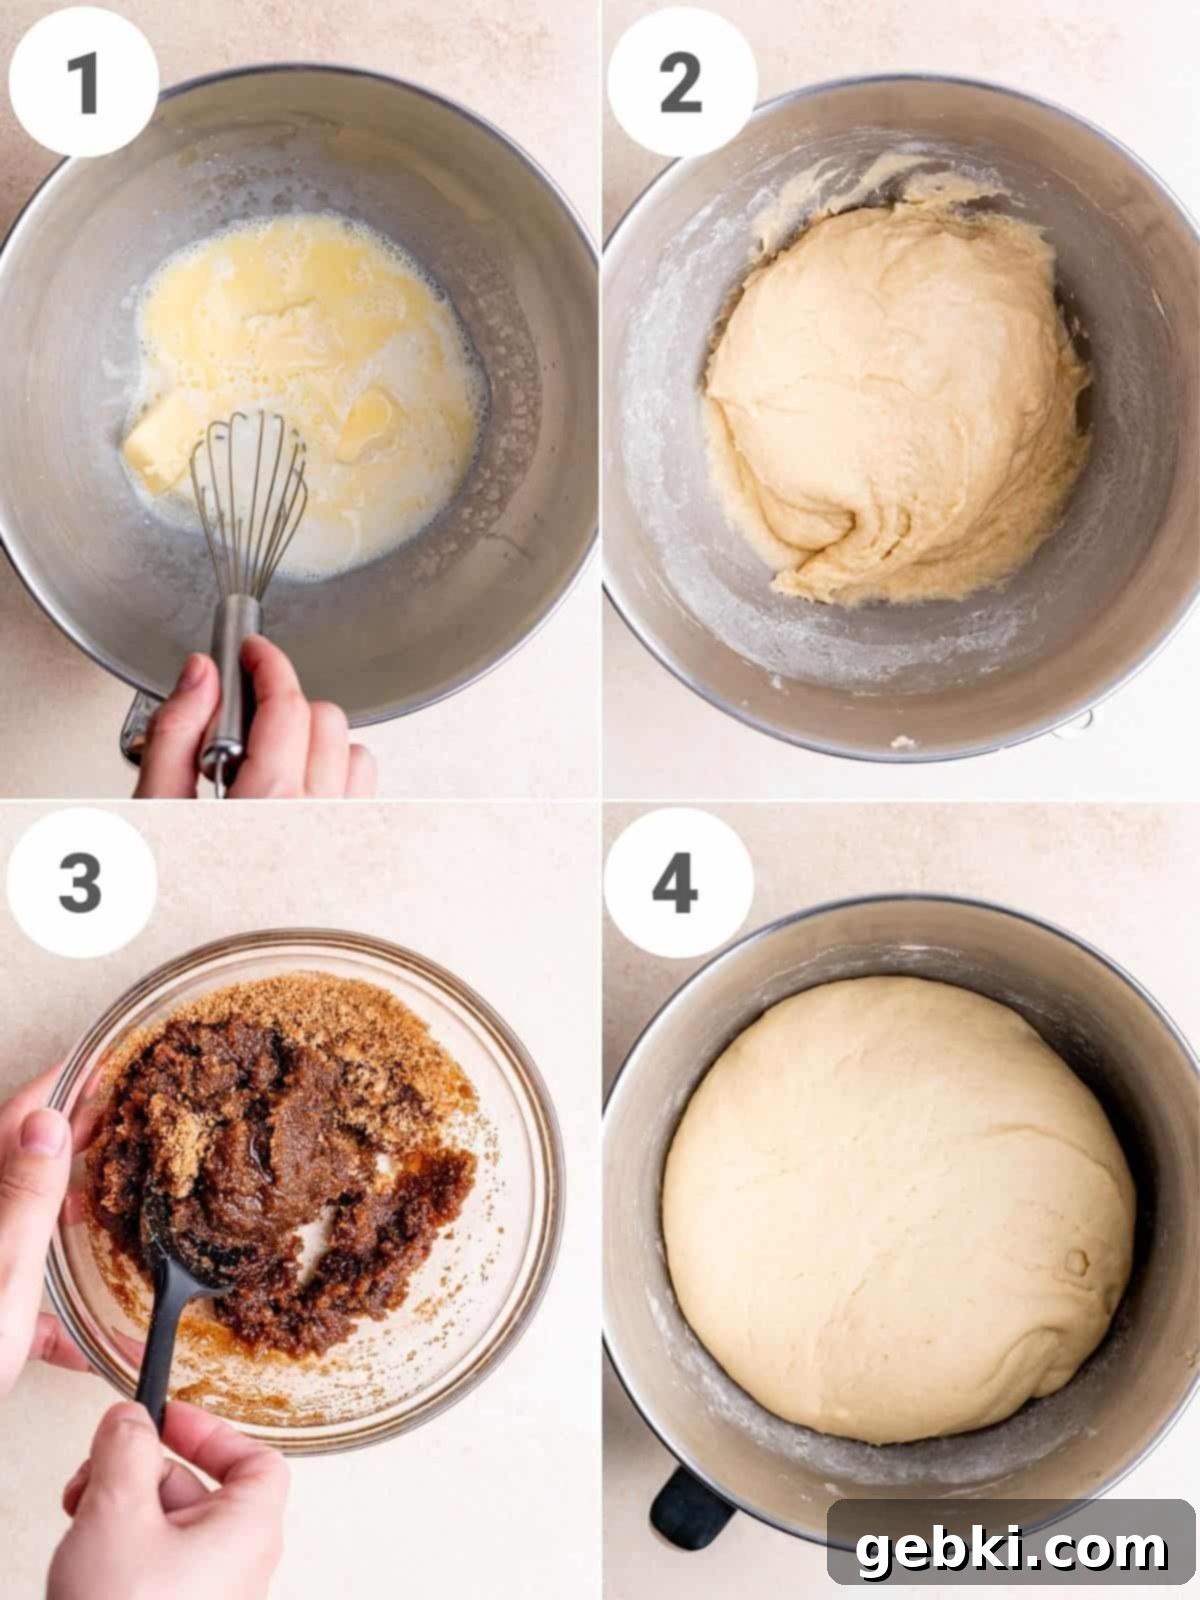
Step One (Picture 1 above) – Activate the Yeast: Begin by heating the whole milk until it just reaches a boil. You can do this on the stovetop or in the microwave. Immediately pour the hot milk into the bowl of your stand mixer. Stir in the unsalted butter until it’s completely melted and incorporated. Next, whisk in the granulated sugar. Allow this mixture to cool down. It’s crucial that the temperature is between 105-110°F (40-43°C) before you add the active dry yeast. Use a thermometer to verify. Once the temperature is right, sprinkle in the yeast and let it sit undisturbed for about 5 minutes. You’ll know your yeast is active if it becomes foamy and bubbly. If it doesn’t bubble after 10 minutes, even if you confirmed the temperature, it’s best to start over with fresh yeast to ensure your rolls rise properly. After activation, whisk in the room temperature eggs, vanilla extract, and salt until well combined.
Step Two (Picture 2 above) – Mix and Knead the Dough: Attach the hook attachment to your stand mixer. With the mixer running on a low speed (1-2), gradually add the all-purpose flour, one cup at a time. After adding about 4 cups, assess the dough’s consistency. It should start to pull away from the sides of the bowl. Continue to add small amounts of flour, a little bit at a time, until the dough is just barely sticky to the touch and forms a soft ball. Be careful not to add too much flour, as this can result in dry rolls. Once the dough reaches the right consistency, let the mixer knead it for about 5 minutes on low speed to develop the gluten. Remove the dough, lightly grease the bowl, return the dough, and cover the bowl with a clean towel. Let it rest in a warm environment until it doubles in size, which typically takes 60-90 minutes. A slightly warm oven (turned off after heating for a few minutes) can be a great place for rising.
Step Three (Picture 3 above) – Prepare the Brown Butter Filling: While your dough is happily rising, it’s time to create the irresistible filling. Melt the unsalted butter in a small pan over medium heat. Continue cooking, stirring frequently, until the butter turns a rich golden-brown color and emits a wonderfully nutty aroma. This process is called “browning butter” and it adds incredible depth of flavor. Immediately remove the pan from the heat to prevent burning and pour the browned butter into a separate bowl to cool completely. Once cooled, mix in the light brown sugar, ground cinnamon, and ground cardamom until everything is well combined and forms a thick paste.
Step Four (Picture 4 above) – Ready the Dough: Once your dough has successfully doubled in size, gently transfer it from the mixing bowl to a lightly floured surface. Avoid overworking it at this stage; we want to preserve its airy texture.
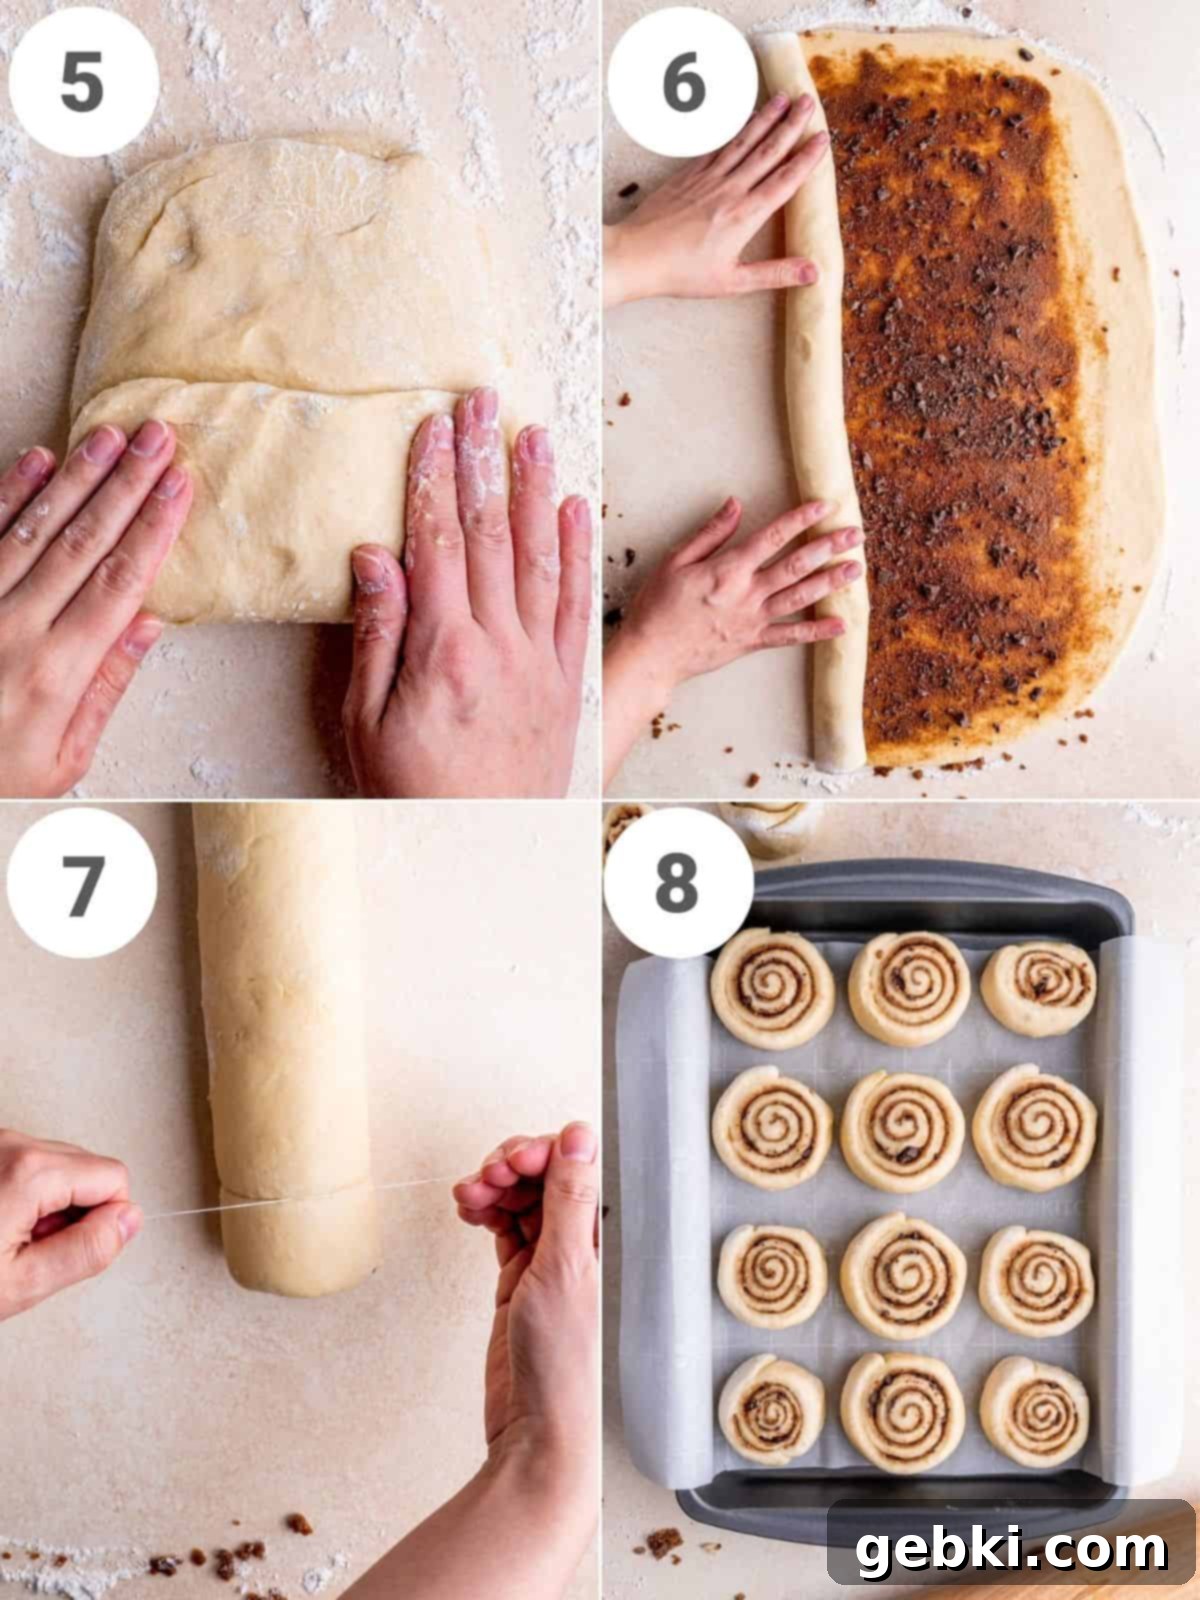
Step Five (Picture 5 above) – Roll Out the Dough: On your floured surface, gently fold the dough into thirds, much like you would a letter or brochure. Flip it over, rotate it 90 degrees, and fold it into thirds again. This process helps create layers and an even texture. Now, using a rolling pin, roll the dough out evenly into a large rectangle, approximately 16×20 inches. Strive for consistent thickness across the entire rectangle.
Step Six (Picture 6 above) – Fill and Roll: Carefully and evenly spread the prepared brown butter, brown sugar, cinnamon, and cardamom filling over the entire surface of the dough. Make sure to leave a 1-inch border along one of the long sides (the 20-inch side) completely empty. This empty edge will help seal the roll later. Now, generously sprinkle your chopped chocolate bar bits over the filling. Starting from the long side that is covered with the filling, tightly and carefully roll the dough into a log. Aim for a snug roll to create those beautiful, distinct swirls.
Step Seven (Picture 7 above) – Slice the Rolls: Once you have a firm log of dough, gently trim off any uneven ends (these are great baker’s treats!). Then, measure and mark the log to ensure you can cut 12 equally sized snickerdoodle rolls. For the cleanest cuts that maintain the dough’s beautiful spiral shape, use unflavored dental floss! Slide a piece of floss under the log, bring the ends up, cross them over each other at your mark, and pull tightly to slice through the dough. (See how this technique works perfectly in this short video for a visual guide!)
Step Eight (Picture 8 above) – Bake or Prepare for Later: Arrange the sliced rolls in a 9×13 inch pan that has been lined with parchment paper. You now have two options: bake them immediately or refrigerate them for baking the next day. If baking now, let them rise for about 30 minutes while your oven preheats to 350°F (175°C). Bake for 20-25 minutes, or until the tops are golden brown. While the rolls are baking, whip up the cream cheese icing. As soon as the rolls come out of the oven, generously spread a layer of the warm icing over them so it melts slightly into the warm cracks and crevices. Wait about 5 minutes for them to cool slightly before serving for the best texture and flavor. Add more icing to your liking and enjoy!
Expert Tips for Success:
- Yeast Activation is Key: Always check your milk temperature with a thermometer. Too hot or too cold can kill or deactivate the yeast. A foamy appearance after 5-10 minutes is your sign of active yeast.
- Warm Rising Environment: Let your dough rise in a cozy room, ideally around 75°F (24°C). If your kitchen is cool, a clever trick is to turn your oven on to its lowest setting for a few minutes, then turn it off, and place the covered bowl of dough inside with the door cracked open. This creates a perfectly warm, draft-free spot for your dough to double in size within 60-90 minutes.
- Don’t Over-Flour: While kneading, add flour gradually. The dough should be soft and slightly sticky, not stiff. Too much flour will result in dry, dense rolls.
- Dental Floss for Clean Cuts: This trick is a game-changer! Using unflavored dental floss to cut your rolls instead of a knife ensures perfectly round, beautiful swirls without squishing the delicate dough.
- Brown Butter Perfection: Don’t rush browning the butter. Stir constantly until it turns amber and smells nutty. This adds a depth of flavor that can’t be replicated.
- Room Temperature Ingredients: For the best consistency in both the dough and the icing, ensure your butter, eggs, and cream cheese are at room temperature.
Substitutions & Creative Variations
While this recipe for Snickerdoodle Rolls is perfected as written, we understand that sometimes you might want to experiment or adapt to ingredients you have on hand. Please note that this recipe has not been extensively tested with substitutions, so results may vary. If you do try any replacements, we’d love to hear how they turned out in the comments below!
Here are a few ideas for variations to inspire your creativity:
- Chocolate Choices: The recipe calls for your favorite chocolate bar, but feel free to experiment! Dark chocolate chips, white chocolate chunks, or even a mix of milk and dark would be delicious. For a nutty crunch, consider a chocolate bar with almonds or toffee bits.
- Spice It Up: If cardamom isn’t your favorite, you can omit it or substitute with a tiny pinch of nutmeg or allspice for a different warm spice profile. For an extra kick, a touch of ground ginger could be interesting, especially during the holidays.
- Nutty Additions: For those who love nuts, finely chopped pecans or walnuts could be folded into the filling along with the chocolate for added texture and flavor.
- Gluten-Free Flour: While not tested, you might try a 1:1 gluten-free baking flour blend for the dough. Be aware that the texture and rise might be slightly different. Ensure your chosen blend contains xanthan gum for elasticity.
- Dairy-Free Options: For a dairy-free version, you could try using a plant-based milk (like almond or soy) and dairy-free butter. Dairy-free cream cheese is also an option for the icing. Again, results may vary in texture and richness.
Make Ahead & Storage Tips for Freshness
These Snickerdoodle Rolls are incredibly versatile when it comes to preparation and storage, making them perfect for busy schedules or planning ahead for special events.
Make Ahead (Refrigeration): To enjoy freshly baked rolls with minimal morning effort, you can prepare the rolls up to the point of placing them in the baking pan. Simply cover the pan tightly with plastic wrap (or an airtight lid) and refrigerate overnight. In the morning, take the pan out of the refrigerator about 30-60 minutes before you plan to bake, allowing the rolls to warm up slightly and finish their final rise while your oven preheats. This crucial step ensures they bake up light and fluffy.
Make Ahead (Freezing): For longer storage, you can freeze the unbaked rolls for up to a month! After cutting and placing the rolls in a parchment-lined pan, cover them tightly with plastic wrap and then aluminum foil to prevent freezer burn. Store them in the freezer. The night before you plan to bake them, transfer the frozen rolls to the refrigerator to thaw slowly overnight. In the morning, let them come to room temperature and rise for about an hour before baking as directed.
Storing Leftovers: Any leftover baked and frosted Snickerdoodle Rolls should be stored in an airtight container at room temperature for up to 2 days, or in the refrigerator for up to 1 week. Reheating them slightly in the microwave will bring back their soft texture and warm flavors.
Freezing Baked Rolls: If you have baked rolls you want to save, allow them to cool completely. Wrap individual rolls tightly in plastic wrap, then in aluminum foil, and store them in a freezer-safe bag for up to 1 month. Thaw at room temperature and reheat gently in the microwave or oven.
Recipe FAQs: Your Questions Answered
For the best results, reheat these delicious rolls in the microwave for about 30-60 seconds. This will restore their soft, warm texture and melt the icing beautifully. You can also cover them loosely with foil and warm them in a preheated oven at 300°F (150°C) for 10-15 minutes until heated through.
There are a couple of common reasons why dough might not rise. The most frequent culprit is inactive yeast. Ensure your yeast is fresh by checking its expiration date and making sure it foams nicely in the milk mixture before adding other ingredients. The second reason is temperature. The yeast needs a warm environment to thrive, so make sure the milk mixture is between 105-110°F (40-43°C) when you add the yeast. Also, your rising environment should be around 75°F (24°C). If your kitchen is cool, try turning your oven on for a minute, then turn it off, and place the covered bowl in the warm oven with the door cracked open to create an ideal rising space.
This is a fun part where you can truly personalize your Snickerdoodle Rolls! Whatever your favorite kind of chocolate bar is, go for it! I personally love using a toffee almond chocolate bar for an added layer of flavor and crunch, but a classic milk chocolate, rich dark chocolate, or even a white chocolate bar would be absolutely delicious. Choose what you love!
Absolutely! While a stand mixer makes kneading the dough much easier, you can certainly knead the dough by hand. This will require about 10-15 minutes of vigorous kneading on a floured surface until the dough is smooth and elastic. It’s a great arm workout and a satisfying way to connect with your baking!
More Delicious Recipes You’ll Love
If you enjoyed these Snickerdoodle Rolls, you’re in for a treat! Here are more fantastic recipes from Broken Oven Baking that are sure to satisfy your sweet tooth and impress your guests:
-
Apple Pie Ice Cream (Ninja Creami Recipe)
-
Chewy Salted Caramel Oatmeal Cookies
-
Strawberry Matcha Ice Cream (Ninja Creami Recipe)
-
Soft Lemon Sugar Cookies (That Actually Taste Like Lemon!)
Did you try this recipe?
Tag @brokenovenbaking on Instagram and leave a ⭐️ review below!
📖 Recipe
Snickerdoodle Rolls
Kayla Burton
Pin Recipe
Equipment
-
Stand mixer with hook attachment
-
Measuring spoons
-
Scale/measuring cups
-
Whisk
-
9×13 inch pan
-
Parchment paper
-
Knife and cutting board
-
Small pan
-
Thermometer
Ingredients
Dough
- 1 cup (236 ml) whole milk
- ½ cup (1 stick) (113.5 g) unsalted butter room temperature
- ¼ cup (50 g) granulated sugar
- 2 large (2 large) eggs room temperature
- 1 teaspoon (1 teaspoon) salt
- ½ teaspoon (½ teaspoon) vanilla extract
- 4-4½ cups (500-563 g) all-purpose flour
- 2¼ teaspoons (1 packet) (2¼ teaspoons (1 packet)) active dry yeast
Filling
- ¾ cup (150 g) light brown sugar packed
- ½ cup (1 stick) (113.5 g) unsalted butter browned
- 2½ teaspoons (2½ teaspoons) ground cinnamon
- 2½ teaspoons (2½ teaspoons) ground cardamom
- 1.5 oz (1.5 oz) chocolate bar chopped into tiny bits
Icing
- 4 oz (½ block) (127.57 g) cream cheese room temperature
- ¼ cup (½ stick) (56 g) unsalted butter room temperature
- 2 cups (240 g) powdered sugar
- 1 teaspoon (1 teaspoon) vanilla extract
- ⅛ teaspoon (¼ teaspoon) ground cinnamon
- ⅛ teaspoon (¼ teaspoon) ground cardamom
Instructions
First, make the dough:
-
Bring the whole milk to a boil over medium-high heat. As soon as it reaches a rolling boil, remove it immediately from the heat. Alternatively, you can microwave it for approximately 3 minutes, checking after each minute to avoid scorching.
-
Carefully pour the heated milk into a large mixing bowl (preferably your stand mixer bowl).
-
Add the room temperature unsalted butter to the hot milk and stir continuously until the butter is completely melted and smoothly combined.
-
Whisk the granulated sugar into the milk-butter mixture. At this point, the mixture should be cooling to about room temperature. If it’s still very warm, wait a few minutes until it’s just warm to the touch (around 105-110°F or 40-43°C).
-
Once the milk mixture registers approximately 105-110°F (40-43°C) on your thermometer, sprinkle the active dry yeast over the surface. Let it sit undisturbed for 5-10 minutes. It should become visibly foamy and bubbly, indicating that the yeast is active. If no foam appears after 10 minutes and you’re confident in your temperature measurement, discard and start again with new yeast.
-
Add the room temperature eggs, salt, and vanilla extract to the yeast mixture. Whisk gently until all ingredients are thoroughly combined.
-
Attach the dough hook to your stand mixer. With the mixer set to a low speed (1-2), gradually add the all-purpose flour, one cup at a time, until you’ve added about 4 cups total. Scrape down the sides of the bowl as needed to ensure everything is incorporated. If the dough is still excessively sticky after 4 cups, slowly add more flour, a tablespoon at a time, until the dough pulls away from the sides of the bowl and is just barely sticky to the touch. Continue to mix (knead) for approximately 5 minutes to develop the gluten.
-
Lightly grease the mixing bowl, return the dough, and cover the bowl tightly with a clean kitchen towel or plastic wrap. Place it in a warm, draft-free environment to rise until it has doubled significantly in size, which typically takes between 60 to 90 minutes. (See expert tips for creating a warm environment if needed).
Meanwhile, prepare the filling:
-
In a small saucepan, heat the unsalted butter over medium heat. Stir constantly as the butter melts, foams, and then begins to turn golden brown, emitting a rich, nutty aroma. This is brown butter, and it’s key to the flavor! As soon as it reaches this stage, remove it from the heat immediately to prevent burning and pour it into a separate heatproof bowl to cool completely to room temperature.
-
Once the browned butter is cool, mix in the packed light brown sugar, ground cinnamon, and ground cardamom until a thick, uniform paste forms.
-
Finely chop your chosen chocolate bar into tiny bits. Set these aside to sprinkle over the filling later.
When the dough has risen:
-
Gently turn the risen dough out onto a lightly floured surface. Fold the dough into thirds, like a business letter or brochure. Flip it over, rotate it 90 degrees, and fold it into thirds again. This helps create internal layers. Finally, gently flatten it into a rough rectangle.
-
Using a rolling pin, roll the dough evenly into a large rectangle, approximately 16×20 inches (40×50 cm). Aim for consistent thickness across the entire surface.
-
Carefully spread the prepared brown butter filling evenly over the entire rolled-out dough. Be sure to leave about a 1-inch (2.5 cm) strip of empty dough along one of the 20-inch long sides. This will act as the seam to seal the roll. Gently rub, don’t press too hard, to avoid tearing the dough.
-
Generously sprinkle the chopped chocolate bits across the filling-covered surface of the dough.
-
Starting with the 20-inch side that is fully covered with filling (opposite the empty strip), tightly and carefully roll the dough into a snug log. Roll towards the empty end, using the empty strip to seal the log once you reach it. Pinch the seam gently to secure.
-
Trim off the slightly uneven ends of the log. Then, measure and mark the log to divide it into 12 equal snickerdoodle rolls. Carefully slice the dough at each mark.
Tip: For perfectly shaped rolls that maintain their beautiful swirls, use unflavored dental floss to cut the dough! Slide a piece of floss under the log, cross the ends over at your mark, and pull them through the dough. This method creates clean cuts without squishing the layers. Arrange the cut rolls evenly in a 13×9 inch (33×23 cm) baking pan lined with parchment paper.
To bake right away:
-
Cover the pan of rolls with a clean towel or plastic wrap. Allow them to rise for approximately 30 minutes in a warm spot while your oven preheats to 350°F (175°C).
-
Bake for 20-25 minutes, or until the tops are golden brown and the rolls are cooked through.
To bake later/the next day:
-
Cover the pan of rolls tightly with plastic wrap and place them in the refrigerator overnight (or for up to 24 hours).
-
When you’re ready to bake the rolls, remove them from the refrigerator while the oven is preheating to 350°F (175°C). This allows them to come to a slightly warmer temperature and complete a gentle rise before baking, which is crucial for their soft texture.
-
Bake for 25-35 minutes, or until the tops are beautifully golden brown. The longer bake time compared to immediate baking is due to starting with cold dough.
To make the icing:
-
In a medium bowl, cream together the softened cream cheese and unsalted butter until light and fluffy. Add the vanilla extract, ground cinnamon, ground cardamom, and gradually beat in the powdered sugar until the icing is smooth, creamy, and free of lumps.
When the rolls are done baking:
-
As soon as the rolls come out of the oven, generously spread a layer of the prepared cream cheese icing over them. The warmth of the rolls will slightly melt the icing, allowing it to seep into all the delicious cracks and swirls. Wait approximately 5 minutes for the rolls to cool slightly before serving for optimal texture. Add more icing to your liking and savor every warm, fluffy, snickerdoodle bite! Enjoy!
Save This Recipe! 💌
We’ll email this post to you, so you can come back to it later!
Notes
The provided nutrition information is an estimate, calculated based on the ingredients listed for one serving. Please note that the calorie accuracy is not guaranteed and can vary based on specific brands and exact measurements used.
The provided nutritional information is an estimate per serving. Accuracy is not guaranteed.
