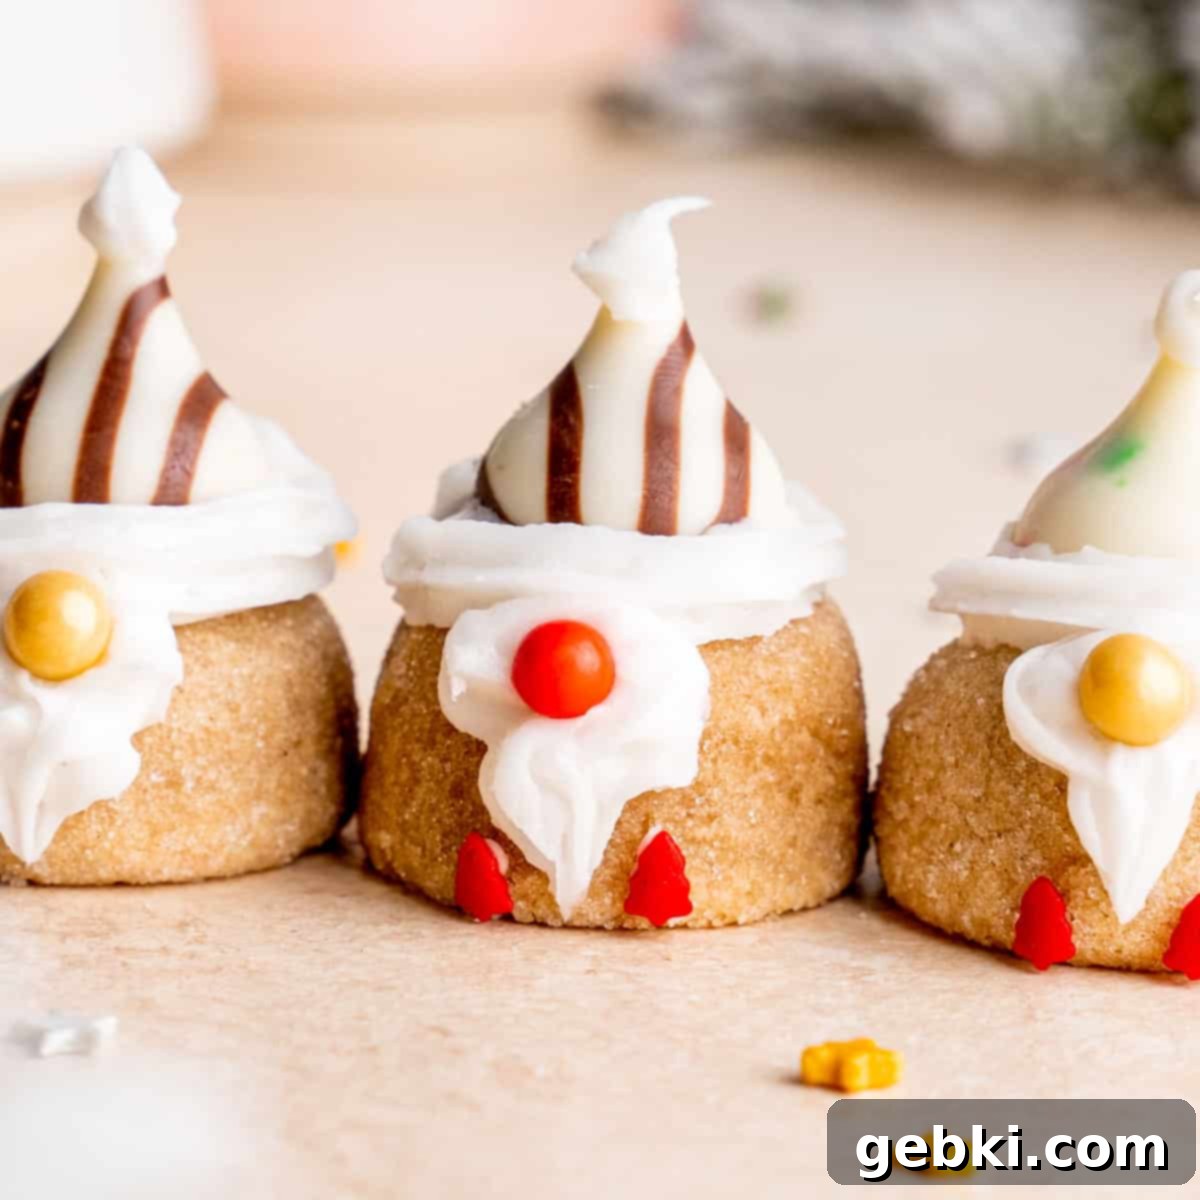
Easy & Adorable Holiday Gnome Cookies: Your New Favorite Peanut Butter Blossom Recipe
Get ready to add a sprinkle of magic to your holiday baking! These **Peanut Butter Blossom Gnome Cookies** are not just a festive treat, but an absolute delight to make and share. If you’re anything like me, classic peanut butter blossoms are a holiday staple, beloved for their soft, chewy texture and the perfect chocolate kiss center. But with **gnomes** charming their way into our hearts and homes, I couldn’t resist giving my favorite cookies a whimsical, gnome-inspired makeover!
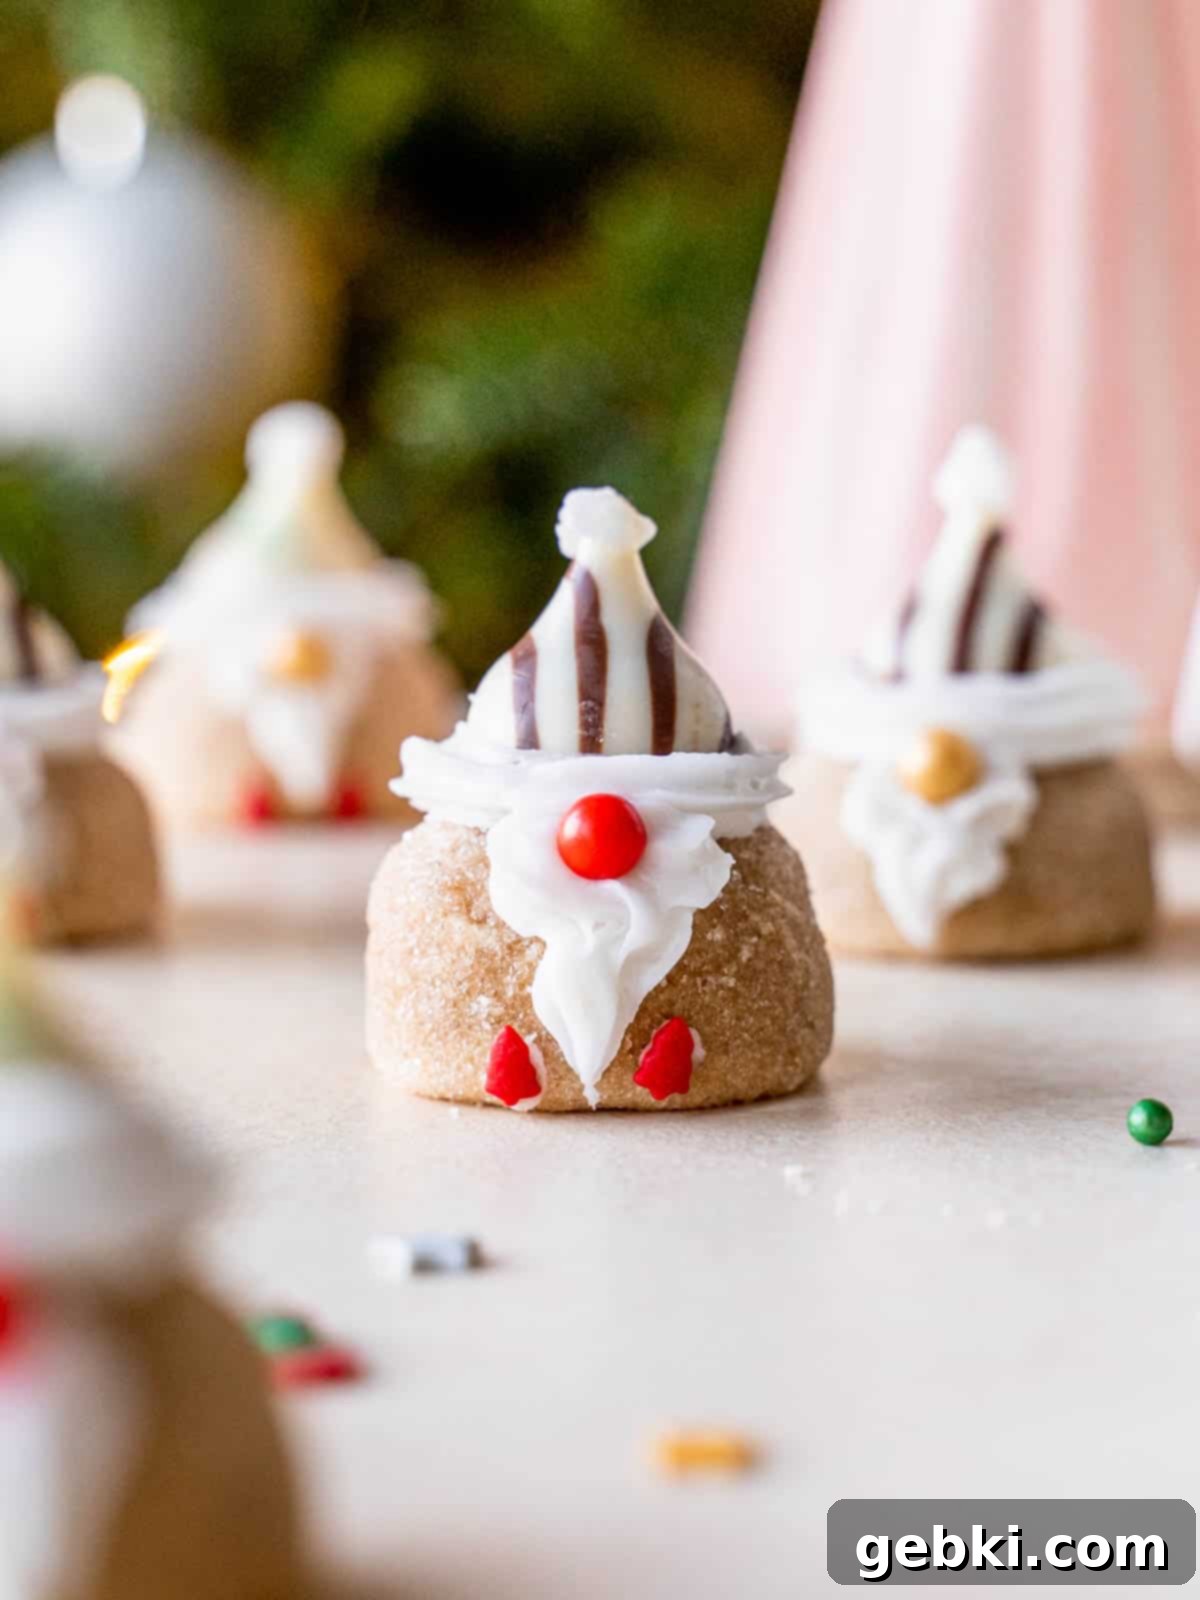
These adorable gnome cookies share the beloved characteristics of traditional peanut butter blossoms: they’re wonderfully soft peanut butter cookies, rolled in sugar for a delightful sparkle, and finished with a classic Hershey’s Kiss. But here’s where the magic happens – a touch of frosting and festive Holiday sprinkles transform them into irresistible little Christmas gnomes! The best part? You don’t need to be a professional cookie decorator to create these charming treats. Their simplicity makes them a perfect holiday baking project for all skill levels, ensuring a fun and stress-free experience.
Do you have a friend who’s absolutely obsessed with gnomes? I certainly do! My best friend, Hannah, is head-over-heels for these mystical little creatures, especially when combined with the joyous spirit of Christmas. While I might playfully tease her for her boundless enthusiasm, I have to give her full credit—these delightful gnome cookies wouldn’t have come to life without her keen eye and creative input! So, a huge thank you, Hannah, this recipe is dedicated to you and all gnome lovers out there!
If you’re looking for more delightful Holiday recipes to fill your festive season with flavor, be sure to explore some of my other favorites: my cheerful Sprinkle Sugar Cookies, the rich and decadent Gingerbread Brownies, and the elegantly spiced Gingerbread Tiramisu Jars. Each one is designed to bring joy and deliciousness to your holiday table!
Essential Ingredients for Your Gnome Cookies
Creating these charming gnome cookies starts with a selection of common pantry staples, ensuring that these treats are as accessible as they are delicious. Each ingredient plays a crucial role in achieving the perfect soft, peanut-buttery base and the adorable festive decorations. Here’s what you’ll need to gather:
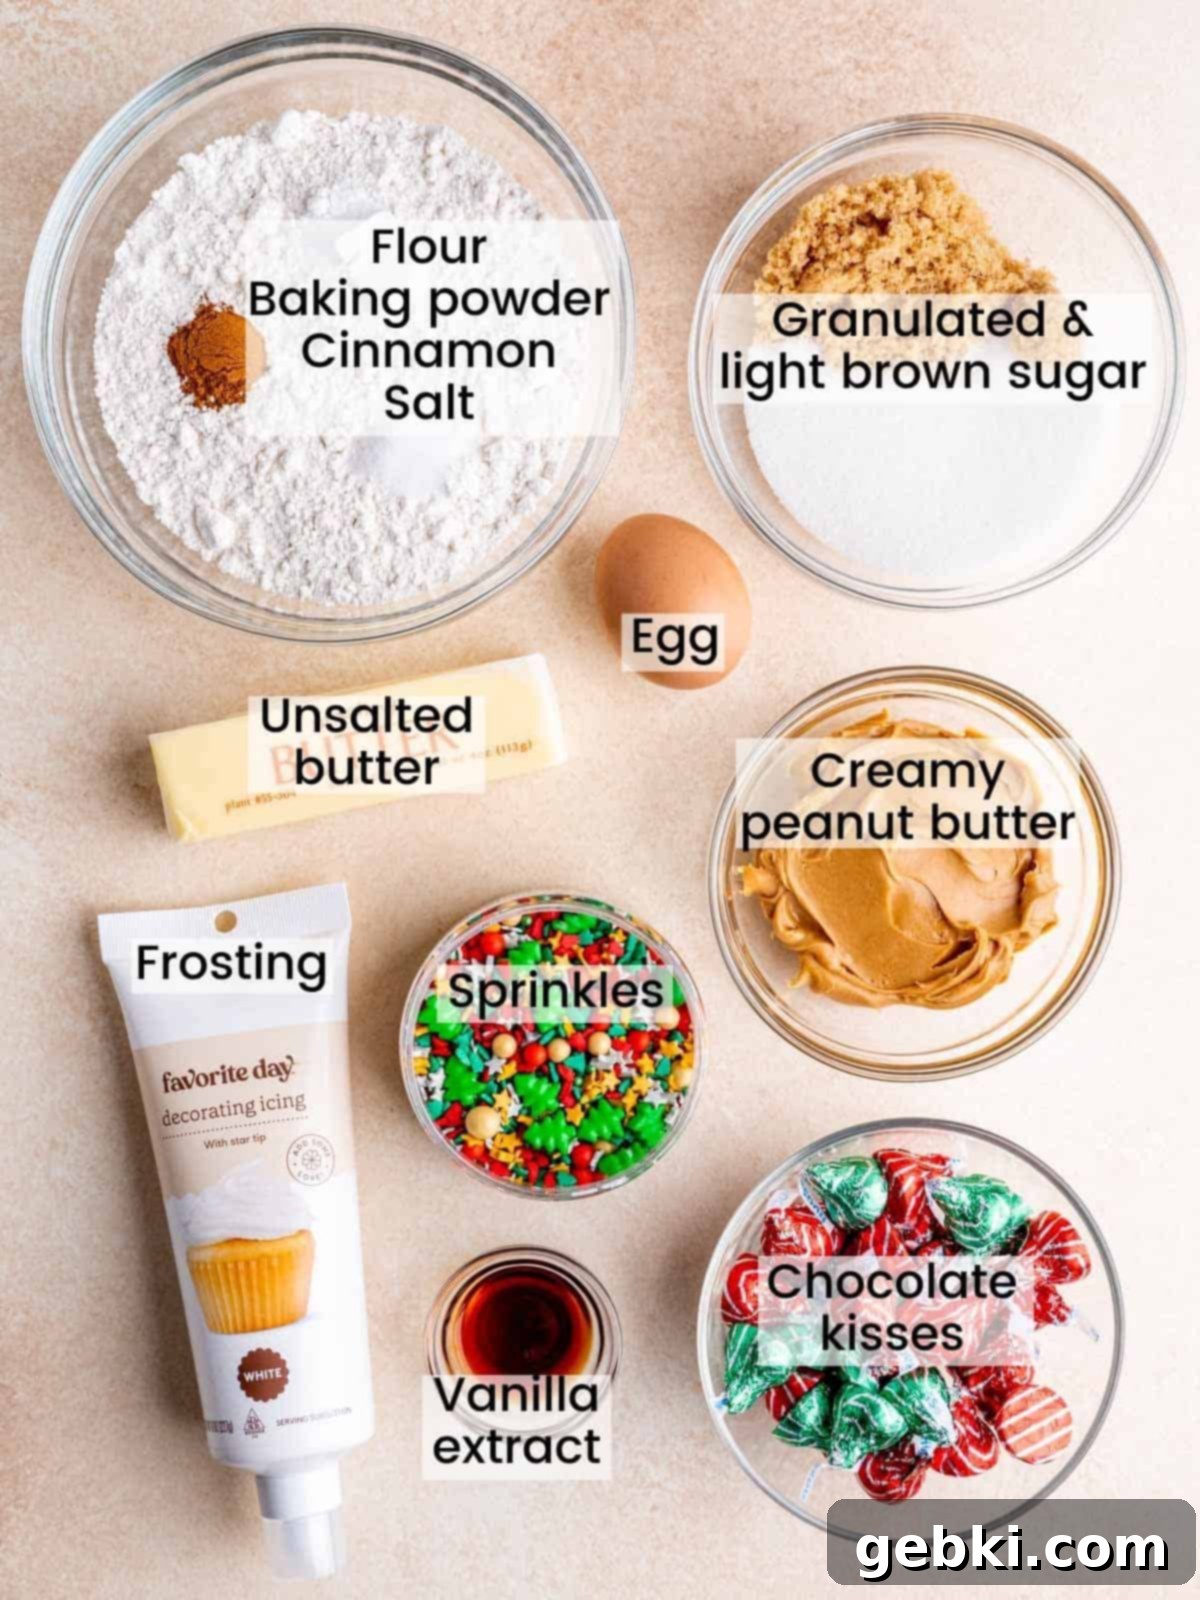
- All-purpose flour: The foundation of our soft cookie base.
- Baking powder: This helps the cookies rise and maintain their perfectly round shape, crucial for our gnomes!
- Cinnamon: Adds a subtle warmth and holiday spice that pairs beautifully with peanut butter.
- Salt: Balances the sweetness and enhances all the flavors.
- Granulated sugar: Used in the dough and for rolling, giving the cookies a lovely crisp exterior.
- Light brown sugar: Contributes to the cookies’ chewiness and depth of flavor.
- Egg: Acts as a binder and adds richness to the dough.
- Unsalted butter: Essential for a tender crumb and rich flavor. Ensure it’s at room temperature for optimal creaming.
- Creamy peanut butter: The star of the show! Use a good quality creamy peanut butter for the best texture and taste.
- Vanilla extract: A flavor enhancer that complements the peanut butter beautifully.
- Holiday sprinkles: These are key for decorating your gnomes’ noses and feet! I used these festive ones, but any fun holiday mix will do.
- Frosting: Essential for both “gluing” the hats and piping the beards and details. Store-bought or homemade vanilla buttercream works perfectly.
- Hershey’s Kisses: These create the iconic “blossom” center and form the perfect gnome hats.
For precise measurements and detailed instructions, please refer to the recipe card below.
Substitutions & Creative Variations for Your Gnome Cookies
While this recipe is crafted for optimal results as written, don’t hesitate to get creative and customize your gnome cookies! Please note that this recipe has not been extensively tested with many substitutions. If you do opt to replace any core ingredients, we encourage you to share your results and any tips in the comments below to help fellow bakers!
When it comes to variations, the possibilities are endless for decorating your delightful gnomes! Let your imagination run wild and truly make these cookies your own. Here are a few ideas to spark your creativity:
- Candy Hats: While Hershey’s Kisses are classic and create the perfect rounded hat, you can experiment with different flavors of Kisses or even other hat-like candies. Consider mini peanut butter cups for a double peanut butter treat, or perhaps chocolate-covered caramels for a different texture. For a surprisingly fresh and fruity twist, I think fresh strawberries would make super cute and vibrant Santa hats – a delightful peanut butter-strawberry flavor combination!
- Frosting Colors and Flavors: You can easily dye your frosting different colors to create a variety of gnome hats and beards. Imagine gnomes with blue hats and white beards for a frosty winter theme, or green hats for an enchanted forest feel. You could also infuse your frosting with different extracts like almond, peppermint, or even a hint of espresso for an added flavor dimension.
- Nose and Feet Sprinkles: Beyond traditional ball sprinkles for the nose, consider mini M&M’s, a small candy pearl, or even a tiny dot of contrasting frosting. For the feet, explore different sprinkle shapes! Tiny candy canes, stars, or even little edible pearls can add unique character to each gnome. The sprinkles I used had tiny Christmas tree shapes, which worked perfectly for little festive feet!
- Themed Gnomes for Any Occasion: These don’t have to be exclusively Christmas gnomes! The beauty of this recipe lies in its adaptability. Simply change up the sprinkles and frosting colors to suit any holiday or special event:
- St. Patrick’s Day: Use green and orange frosting with shamrock sprinkles.
- Valentine’s Day: Opt for red, pink, and purple frosting with heart-shaped sprinkles.
- Halloween: Black and orange frosting with spooky ghost or pumpkin sprinkles.
- Easter: Pastel colors with bunny or egg sprinkles.
- Birthday Parties: Use the birthday person’s favorite colors and sprinkles!
Embrace the fun and make each gnome unique. These cookies are a fantastic way to express your creativity and personalize your treats for any celebration!
Essential Equipment for Crafting Gnome Cookies
One of the many joys of making these gnome cookies is how straightforward the process is. You won’t need any fancy cookie cutters or intricate rolling pins; just your standard cookie-making equipment, plus a couple of simple tools for decoration. This makes them accessible for bakers of all experience levels. Here’s a breakdown of the essential equipment:
- Baking Sheet: A sturdy, reliable baking sheet is crucial for evenly baked cookies. I highly recommend this one from USA Pan – it’s a personal favorite for its consistent results. Lining it with parchment paper or a silicone baking mat will prevent sticking and ensure easy cleanup.
- Wire Cooling Rack: After baking, your cookies will need to cool completely. A wire cooling rack allows air to circulate around the cookies, preventing them from becoming soggy on the bottom and ensuring they firm up properly before decorating.
- Hand Mixer or Stand Mixer with Paddle Attachment: For combining the butter and sugars into a light, fluffy mixture, a mixer is invaluable. A hand mixer works perfectly for smaller batches and offers portability, while a stand mixer provides hands-free operation, allowing you to multitask. The paddle attachment is ideal for creaming and mixing cookie dough.
- Mixing Bowls: You’ll need at least one medium bowl for dry ingredients and a large bowl for wet ingredients and combining the dough.
- Measuring Cups and Spoons (or a Kitchen Scale): Accurate measurements are key in baking. While measuring cups and spoons are standard, a kitchen scale for weighing dry ingredients (like flour) will give you the most precise results, ensuring your cookies have the perfect texture every time.
- Rubber Spatula: Essential for scraping down the sides of your mixing bowl, ensuring all ingredients are fully incorporated into the dough.
- Medium Star Piping Tip and Piping Bag (or Premade Icing Tube): This is where the gnome magic happens! A medium star piping tip creates the perfect texture for the gnome’s beard and the fluffy trim of their Santa hat. You can either use a traditional piping bag with a separate tip and make your own frosting, or opt for the convenience of premade icing in a tube with an attached star tip, which is a fantastic shortcut I often use.
With these basic tools, you’ll be well-equipped to bake and decorate a batch of irresistibly cute holiday gnome cookies!
How to Craft Your Adorable Holiday Gnome Cookies
Bringing these charming gnome cookies to life is a fun and surprisingly easy process. We’ll start by baking the perfect peanut butter blossom base, then move on to the simple yet effective decorating steps that transform them into festive gnomes. Follow these instructions, and you’ll have a batch of these delightful treats ready in no time!
Quick Decorating Video
For a visual guide on just how simple and satisfying the decorating process is, check out this short video. It demonstrates the easy techniques to turn your peanut butter blossoms into cute holiday gnomes with frosting and sprinkles!
Detailed Step-by-Step Instructions
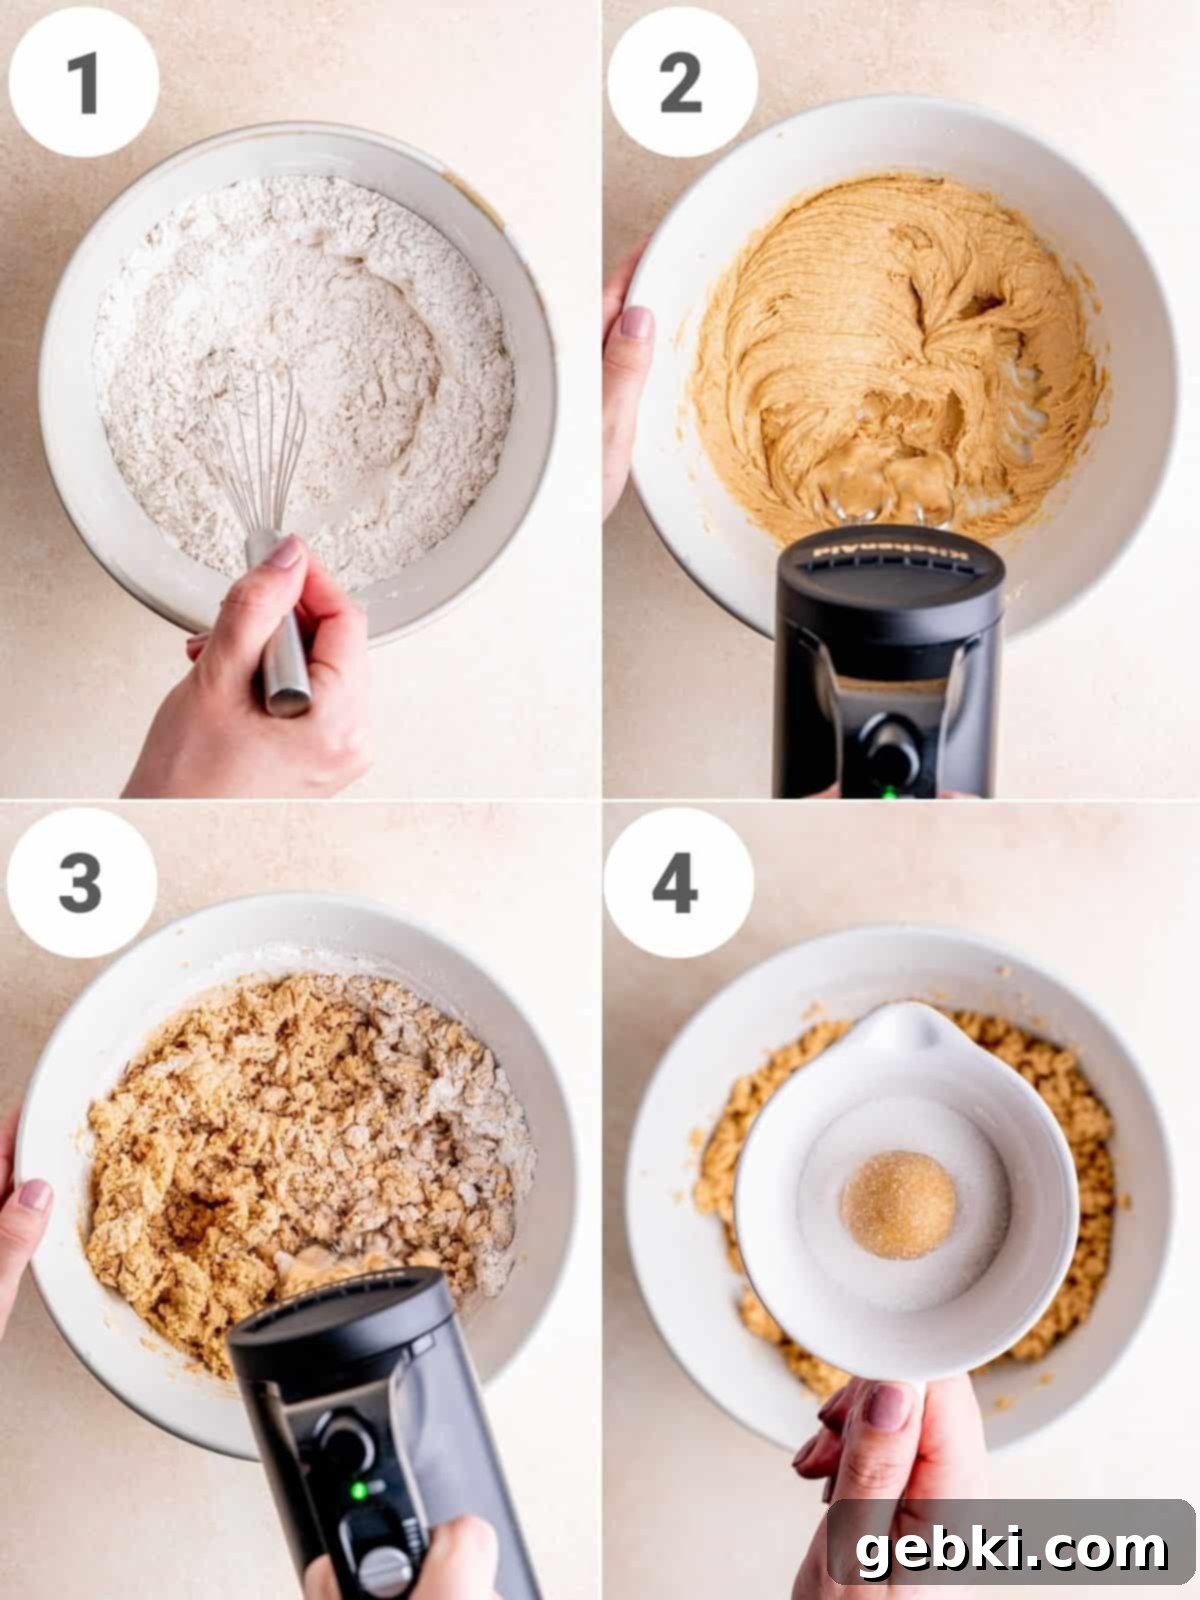
Step One: Prepare Dry Ingredients (Picture 1 above) – In a medium-sized mixing bowl, thoroughly whisk together the all-purpose flour, baking powder, ground cinnamon, and salt. Whisking ensures these ingredients are evenly distributed, which is essential for consistent cookie texture and flavor. Set this bowl aside.
Step Two: Cream Wet Ingredients – In a large mixing bowl, using either a hand mixer or a stand mixer fitted with a paddle attachment, cream together the softened unsalted butter and both the granulated and light brown sugars. Beat them on medium speed for approximately 2 minutes, or until the mixture becomes notably light and fluffy. This aeration process is vital for creating soft, tender cookies. Next, mix in the creamy peanut butter until just combined. Then, add the egg and vanilla extract one at a time, mixing well after each addition until fully incorporated. Ensure your butter and egg are at room temperature for the best emulsion and smoothest dough.
Step Three: Combine Wet and Dry (Picture 2 & 3 above) – Gradually add the whisked dry ingredients into the wet mixture. Mix on low speed until all flour streaks have just disappeared and a cohesive dough forms. Be careful not to overmix, as this can lead to tough cookies. As you mix, use a rubber spatula to scrape down the sides and bottom of the bowl periodically, ensuring all ingredients are fully incorporated and no pockets of dry flour remain.
Step Four: Roll and Bake Cookies (Picture 4 above) – Preheat your oven to 350°F (175°C). Take the cookie dough and roll it into uniform 1-inch balls. Then, roll each dough ball in granulated sugar to coat it completely; this gives the cookies a beautiful sparkle and a slightly crisp edge. Place the sugar-coated dough balls onto a prepared baking sheet, leaving about 1-2 inches between each to allow for slight spreading. Bake for approximately 8 minutes. You’re looking for cookies that are set around the edges but still slightly soft in the center. Don’t overbake! Immediately after removing the cookies from the oven, perform a “cookie scoot.” This involves carefully placing a slightly larger round cookie cutter or the rim of a small cup over each hot cookie and gently scooting it around in a circle. This technique helps reshape the cookies into perfect rounds and encourages them to gain back a little height, creating an ideal base for your gnomes. You can see a quick video on cookie scooting here!
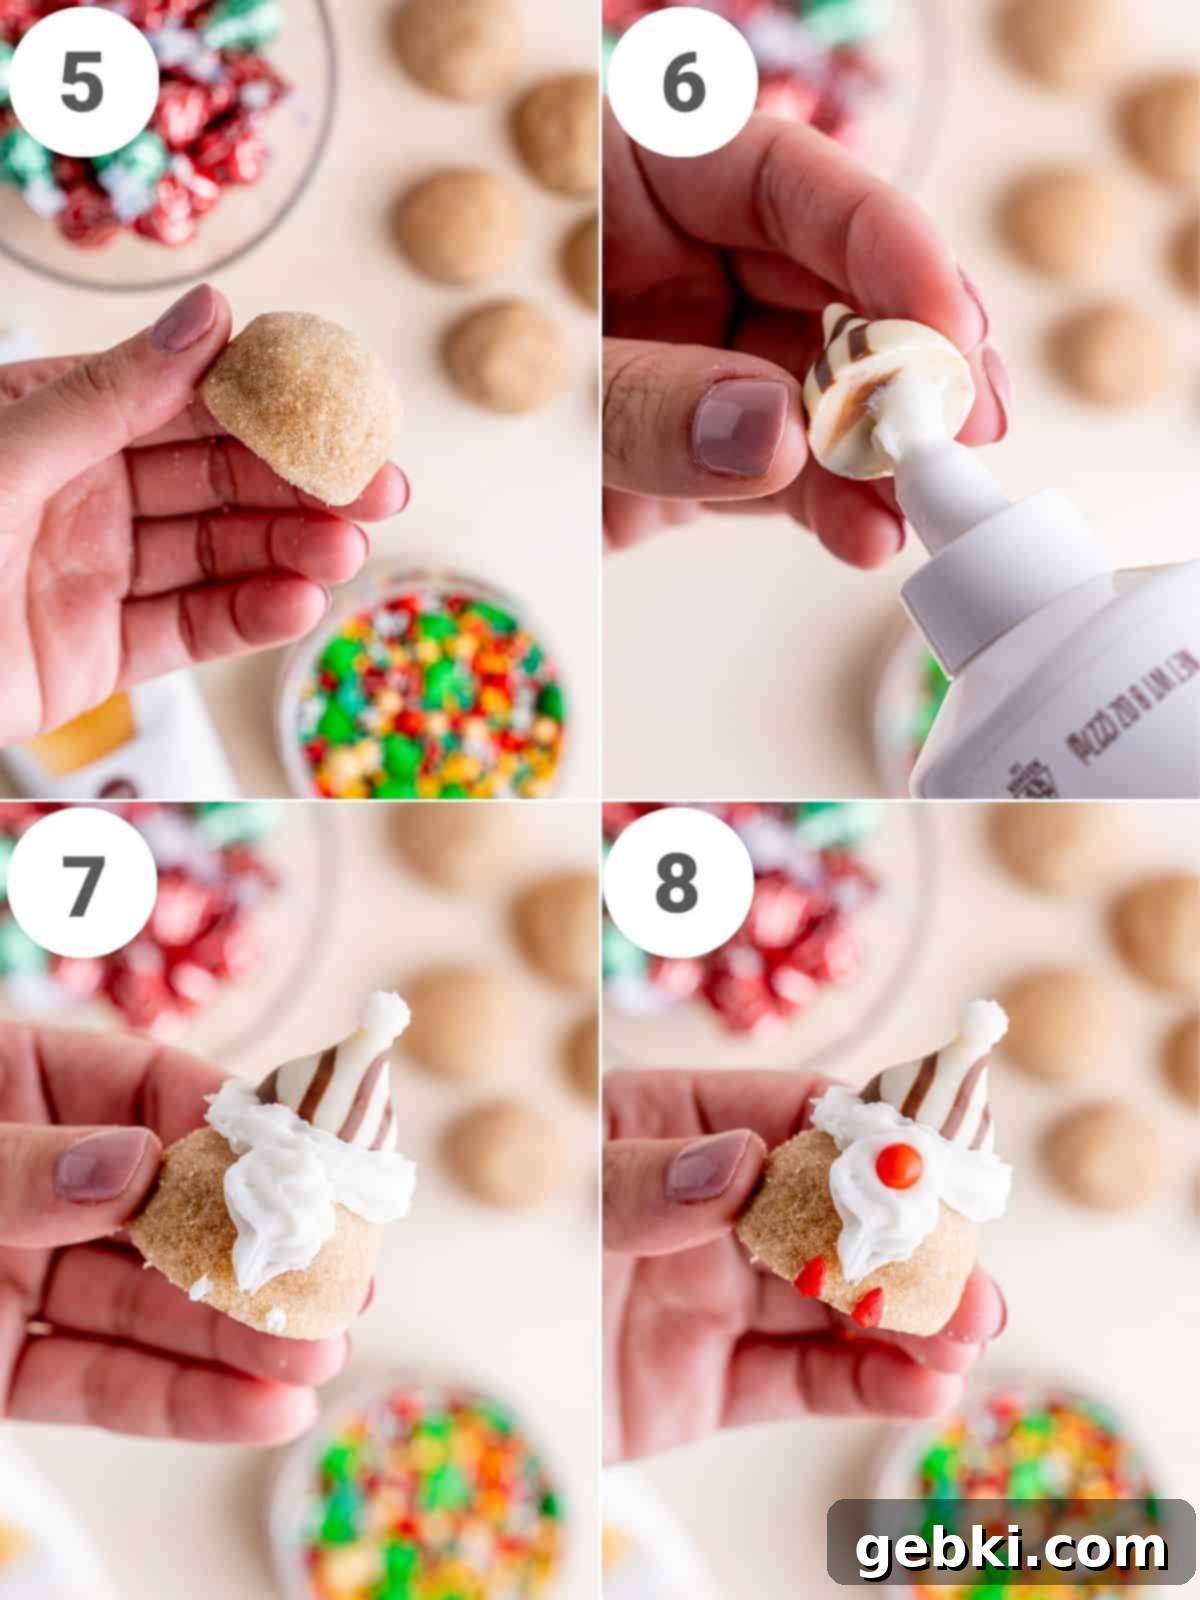
Step Five: Cool Completely (Picture 5 above) – After the initial cooling on the baking sheet, transfer the cookies to a wire rack to cool completely. This step is crucial! Attempting to decorate warm cookies will cause your frosting to melt and your Hershey’s Kisses to slip, ruining your gnome’s charming appearance.
Step Six: Attach the Hats (Picture 6 above) – Once the cookies are entirely cool, unwrap your Hershey’s Kisses. Apply a small dab of frosting to the flat bottom of each Kiss. This frosting acts as a “glue.” Carefully press the Kiss onto the top center of each peanut butter cookie, positioning it to resemble a gnome’s hat. Hold it for a few seconds to ensure it adheres.
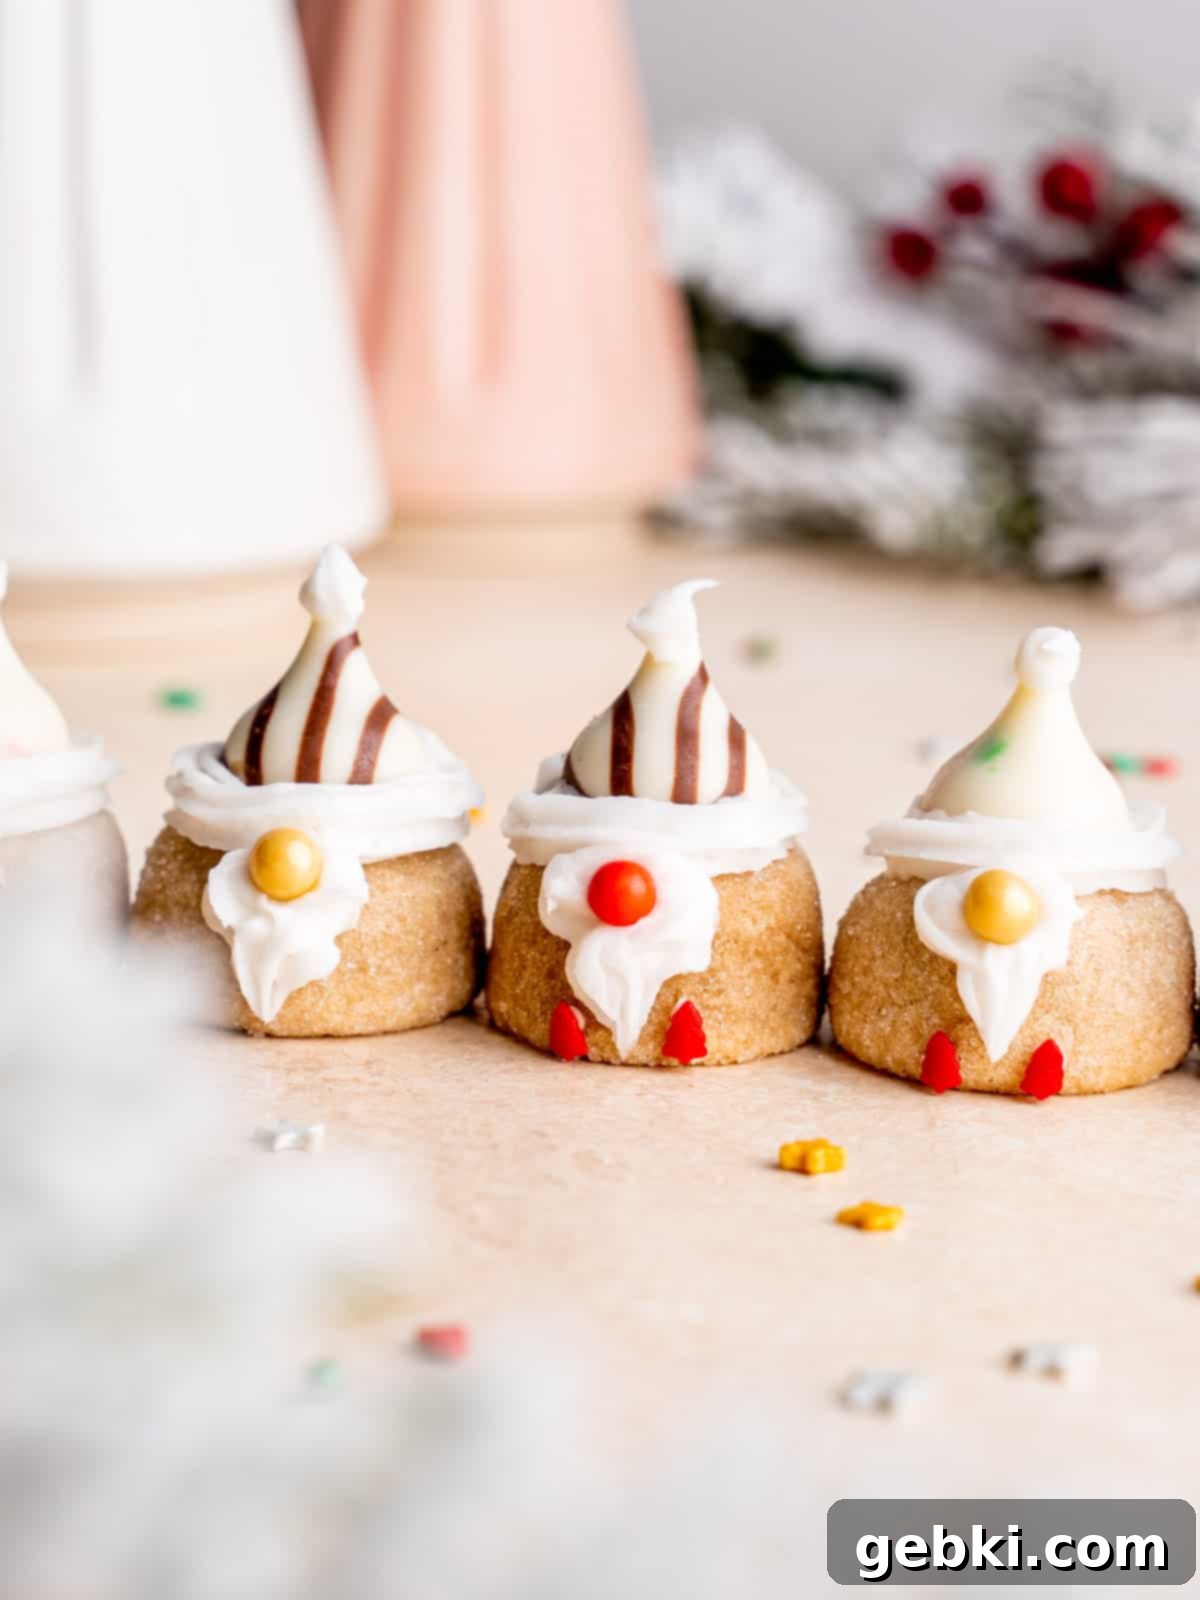
Step Seven: Pipe the Hat Trim and Beard (Picture 7 above) – Using your piping bag fitted with a medium star tip and filled with frosting, begin by piping a small line of frosting around the bottom edge of the Hershey’s Kiss, creating the fluffy brim of a Santa hat. Then, pipe a small dollop of frosting on the very tip of the Kiss to complete the Santa hat look. Next, pipe a wave-like or cloud-like design from directly under the hat down to the bottom edge of the cookie. This forms the gnome’s characteristic fluffy beard. Finally, pipe two tiny dabs of icing on each side of the beard, at the very bottom of the cookie – these will be for the feet.
Step Eight: Add Nose and Feet (Picture 8 above) – Gently place a round sprinkle (or a small candy pearl) over the piped beard, just below the Santa hat. This will be your gnome’s adorable nose. Then, carefully place small, decorative sprinkles onto the two tiny dabs of icing you piped for the feet. The sprinkles I used had charming tiny Christmas tree shapes, which made perfect little gnome shoes! Press them lightly to secure them.
Pro Tip: To ensure your cookies remain soft and chewy, be mindful not to overbake them. An extra minute or two in the oven can lead to dry, crumbly cookies, and we want our gnomes to be perfectly tender!
Frequently Asked Questions About Gnome Cookies
Achieving perfectly round, taller cookies is key for our gnomes! We use baking powder instead of baking soda in this recipe, which helps prevent excessive spreading. Additionally, I’ve adjusted the flour ratio slightly higher, and the baking time is kept a bit shorter. The “cookie scooting” technique immediately after baking (as detailed in Step Four) is also a game-changer for maintaining that ideal round shape and height.
While it’s tempting for a shortcut, I generally don’t recommend using premade store-bought cookie dough for this specific recipe. This recipe is carefully formulated to produce a cookie that holds its round shape well, which is crucial for creating the gnome’s form. Most prepackaged cookie doughs are designed to spread out more, resulting in flatter cookies that might not be ideal for gnome assembly.
For decorating your gnomes, a sturdy yet pipeable frosting is best. If you don’t have the convenience of premade icing in a tube with a star tip, I highly recommend making a classic vanilla buttercream. It pipes beautifully and holds its shape well. This recipe from Sally’s Baking Addiction is my go-to for its reliability and delicious flavor, though you’ll likely have a good amount of leftover frosting if you make a full batch.
No, chilling the dough is not a necessary step for these particular peanut butter gnome cookies. The recipe is designed to work well without it, saving you valuable time! However, if you prefer to enhance the flavors, create a slightly thicker cookie, or simply need to take a break from baking, you absolutely can refrigerate the dough for anywhere from 1 hour up to 2 days. Just ensure it comes to a slightly softer temperature before rolling for easier handling.
Absolutely! If you enjoyed making and eating these gnome cookies, you’ll definitely love some of our other creations. For more delightful peanut butter and chocolate combinations, check out our Chocolate Peanut Butter Whoopie Pies. If you’re a fan of the blossom style, our Almond Butter Blossoms offer a delicious nutty alternative. And for all the peanut butter lovers out there, you won’t want to miss our incredibly easy and satisfying Chocolate Peanut Butter Rice Krispies treats!
Yes, you can! You can prepare the dough, roll it into balls, and coat them in sugar. Store these dough balls in an airtight container in the refrigerator for up to 2-3 days. When ready to bake, simply place them on your baking sheet and proceed with baking as directed.
Storage & Freezing Tips for Gnome Cookies
Once you’ve baked and decorated your delightful gnome cookies, proper storage will ensure they stay fresh and delicious for as long as possible. These cookies are fantastic for making ahead, whether for holiday gifting or simply to enjoy throughout the week.
Room Temperature Storage: Store your fully assembled gnome cookies in an airtight container at room temperature. They will maintain their freshness, soft texture, and delightful flavor for up to 1 week. Placing parchment paper between layers can help prevent any frosting transfer if they are stacked.
Freezing Instructions: These cookies are also excellent candidates for freezing, offering you two convenient methods to prepare them in advance:
- Freezing Raw Dough Balls: If you want to bake fresh cookies later, roll the dough into 1-inch balls as instructed in the recipe, but do not roll them in sugar yet. Place these dough balls on a baking sheet and freeze until solid (about 1-2 hours). Once frozen, transfer them to a freezer-safe airtight container or a heavy-duty freezer bag. They can be stored in the freezer for up to 1 month. When you’re ready to bake, preheat your oven, then roll the frozen dough balls in sugar and bake for 8-10 minutes (you might need an extra minute or two compared to fresh dough, so keep an eye on them).
- Freezing Baked (Undecorated) Cookies: You can also bake the peanut butter blossoms as directed, but stop before decorating them with the Kisses, frosting, and sprinkles. Let the baked cookies cool completely, then arrange them in a single layer on a baking sheet and freeze until solid. Once frozen, transfer them to an airtight freezer container or bag. They can be frozen for up to 1 month. When you’re ready to decorate, simply let the cookies thaw at room temperature before proceeding with Steps Six through Eight. They can even be decorated while still slightly frozen, which can sometimes make them easier to handle!
These storage options make it easy to enjoy your charming gnome cookies whenever the craving strikes or to prepare them in stages during a busy holiday season!
More Delicious Recipes You’ll Love
-
Chewy Salted Caramel Oatmeal Cookies
-
Soft Lemon Sugar Cookies (That Actually Taste Like Lemon!)
-
Sourdough Discard Coffee Cake
- Food Blogger Favorites: Must-Try Holiday Recipes!

Did you bring these Gnomes to life?
I hope you enjoyed creating these fun and festive gnome cookies! Your feedback means the world to me. Let us know what you thought by leaving a comment below. Don’t forget to share your delightful creations on social media by tagging us on Instagram, Facebook, & Pinterest!
Thank you for baking with me!
-Kayla
📖 Recipe: Peanut Butter Blossom Gnome Cookies

Gnome Cookies are the cutest and easiest Christmas cookies! They’re soft, delicious peanut butter blossoms decorated with icing and sprinkles, perfect for holiday fun.
Author: Kayla Burton
Prep Time: 40 mins
Cook Time: 8 mins
Cooling Time: 30 mins
Total Time: 1 hr 18 mins
Course: Dessert
Cuisine: American
Servings: 36 cookies
Calories: 124 kcal
Kayla’s Top Tip: Weigh dry ingredients in grams (g) with a food scale for best results!
Equipment
- Baking sheet
- Hand or stand mixer with paddle attachment
- Measuring spoons
- Kitchen scale / measuring cups
- Mixing bowls
- Whisk
- Spatula
- Medium star piping tip and piping bag (or premade icing tube)
- Wire rack
Ingredients
- 2 cups (250 g) all-purpose flour
- 1 teaspoon baking powder
- ½ teaspoon ground cinnamon
- ¼ teaspoon salt
- ½ cup (1 stick) (113.5 g) unsalted butter, room temperature
- ½ cup (100 g) granulated sugar
- ¼ cup (50 g) light brown sugar, packed
- ½ cup (129 g) creamy peanut butter
- 1 large egg, room temperature
- 2 teaspoons vanilla extract
- ¼ cup (50 g) granulated sugar, for rolling
- 36 Hershey’s Kisses
- Decorating Icing*
Instructions
Making the Cookies
- Preheat oven to 350°F (175°C).
- In a medium bowl, whisk together the flour, baking powder, cinnamon, and salt. Set aside.
- In a large bowl, using a hand mixer or stand mixer with the paddle attachment, cream together the butter, granulated sugar, and brown sugar until light and fluffy (about 2 minutes on medium speed). Stir in the peanut butter, followed by the egg and vanilla extract. Mix well until combined.
- Slowly mix the flour mixture into the wet ingredients until the dough comes together and no dry streaks remain. Scrape the sides of the bowl with a spatula as needed to ensure all ingredients are incorporated.
- Form 1-inch dough balls and roll them in sugar. Place them on the baking tray 1-2 inches apart and bake for 8-9 minutes. When hot out of the oven, carefully place a small cup or cookie cutter over one cookie at a time and move it around in a circle to bring the cookie edges in and give it more height (“cookie scooting”).
- Let the cookies cool on the baking sheet for 5-10 minutes, then transfer them to a wire rack to finish cooling completely. This is crucial before decorating.
Assembling the Gnomes
- Using the frosting as glue, place a dab on the bottom of a Hershey’s Kiss and then attach it to the top of a cooled cookie for the gnome’s hat.
- With the star tip, pipe frosting around the bottom of the hat and then place a dab on the tip of the hat, so it looks like a Santa hat!
- Pipe a wave of frosting from the bottom of the hat to the bottom of the cookie for the gnome’s beard.
- Place a round sprinkle on top of the beard, right below the hat for the nose. Then, using frosting as glue, secure two small sprinkles on the bottom of the cookie on each side of the beard for feet.
Video Tutorial
Notes
*If you don’t have premade icing in a tube with a star decorating tip, use a medium star tip and piping bag. I recommend using vanilla buttercream (this recipe is my go-to, but you should only need ½ cup or less).
Store cookies in an airtight container at room temperature for up to 1 week or in the freezer for up to 1 month.
Freezing Instructions (2 different ways):
- Freezing Dough Balls: Roll the dough into balls and freeze them (without sugar coating). When ready to bake, roll them in sugar as the oven preheats and bake for 8-10 minutes.
- Freezing Baked Cookies: Freeze the baked but undecorated cookies. Let them thaw at room temperature before decorating, or decorate while still frozen for easier handling.
The provided nutrition information is an estimate; the calorie accuracy is not guaranteed.
Carbohydrates: 16g
Protein: 2g
Fat: 6g
Saturated Fat: 3g
Polyunsaturated Fat: 1g
Monounsaturated Fat: 2g
Trans Fat: 1g
Cholesterol: 13mg
Sodium: 54mg
Potassium: 37mg
Fiber: 1g
Sugar: 10g
Vitamin A: 90IU
Vitamin C: 1mg
Calcium: 21mg
Iron: 1mg
The provided nutritional information is an estimate per serving. Accuracy is not guaranteed.
Tried this recipe? Leave a comment below & tag @brokenovenbaking on social!
