Mastering the Exposure Triangle: Essential Camera Settings for Stunning Food Photography
Hey there, aspiring food photographers and culinary content creators! If you’re passionate about capturing delicious moments and making your dishes look as good as they taste, this guide is crafted just for you. Whether you’re just starting your journey into the captivating world of food photography or seeking to refine your existing skills, understanding the fundamentals is key. Photography has always been a hidden passion of mine, a fascination that began in middle school darkrooms, long before digital cameras dominated the scene. While this post won’t take us back to film, it dives deep into the digital realm, sharing practical knowledge and techniques that have personally worked wonders for me. Please remember, I’m sharing my experience and practical tips, not speaking as a seasoned photography guru. For those curious about my go-to equipment and software, you can find a comprehensive list in this dedicated post.
Choosing Your Camera: The Right Tool for Food Photography
The vast universe of cameras can feel overwhelming, with countless models offering unique features. Many professional food photographers often recommend DSLR cameras, renowned for their versatility and robust image quality. However, I took a slightly different path and opted for a mirrorless digital camera, a decision I’ve been incredibly happy with!
Why go mirrorless? Beyond the excellent advice from my photographer boyfriend (whose judgment I trust implicitly!), mirrorless cameras represent a newer wave of camera technology, packed with compelling advantages. Just as computers evolve, so do cameras, and mirrorless systems are at the forefront of this evolution. They are typically more compact and lighter, making them easier to handle during those intricate food styling sessions. A standout feature is the live preview, allowing you to see exactly how your shot will look—exposure, white balance, and all—on your screen before you even press the shutter. This real-time feedback is invaluable for quickly adjusting settings and achieving your desired outcome. Furthermore, their autofocus speed is often remarkably fast and precise, crucial for capturing those fleeting perfect moments.
My first professional camera was the Fujifilm X-T3 mirrorless digital camera, paired with a versatile 35mm lens. It proved to be an excellent choice for a beginner like me: user-friendly, powerful, and reasonably priced for the quality it delivered. This setup allowed me to quickly grasp manual settings and produce stunning images.
However, it’s crucial to understand that you absolutely do not need the latest mirrorless or DSLR camera to create breathtaking food photos. Remarkable results can be achieved with a well-chosen DSLR, or even the advanced camera on your smartphone! The fundamental principles of photography, particularly those within the Exposure Triangle, remain universally applicable, regardless of the equipment you use. Investing in understanding these basics will elevate your photography far more than continually upgrading your gear. For food photography, a prime lens (like a 50mm or 35mm) is often recommended for its sharpness and ability to create beautiful background blur (bokeh), but even a kit lens can produce great results once you understand your camera settings.
To give you a visual aid, I’ve included a video below where I demonstrate the principles of the Exposure Triangle while photographing my irresistible edible chocolate chip cookie dough. For those who prefer to read, all the details are also laid out comprehensively in the following sections.
What is the Exposure Triangle? The Holy Trinity of Light
While you don’t need to become a certified photography expert overnight to take mouth-watering food photos, a solid grasp of the three core camera settings—Aperture, Shutter Speed, and ISO—and how they intricately work together is absolutely fundamental. This trio forms what photographers call the “Exposure Triangle.” Think of it as the holy trinity that dictates how bright or dark your image will be, how much of your dish will be in sharp focus, and how much motion your camera captures. Each setting impacts the final look of your photo, particularly its exposure (brightness), and learning to balance them is key to transforming ordinary food shots into extraordinary visual feasts. Mastering these settings gives you creative control, allowing you to craft the mood and narrative of your culinary creations, ensuring your food looks as appetizing on screen as it does in person.
The Light Meter: Your Exposure Guide

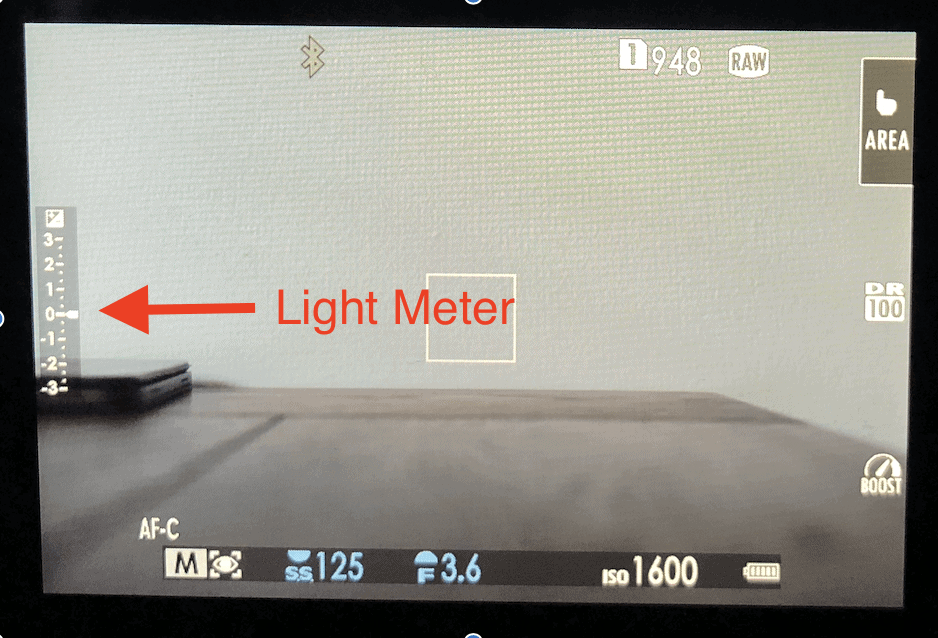
Before we dive into the specifics of Aperture, Shutter Speed, and ISO, let’s briefly discuss a crucial tool visible in your camera’s viewfinder or on its screen: the light meter. This little indicator is your best friend for achieving perfectly exposed images. It constantly tells you if your photo will be under-exposed (too dark), over-exposed (too bright), or just right. The meter typically shows a scale with “0” as the balanced exposure, and numbers moving into the negatives (underexposed) and positives (overexposed).
For many photographers, myself included, aiming for a light meter reading between 0 and -1 is ideal. Why? Because it’s almost always better to slightly underexpose an image than to overexpose it. When a photo is overexposed, bright areas can become “blown out” or “clipped,” meaning all the detail is lost and cannot be recovered in editing. Think of the delicate highlights on a glossy glaze – if overexposed, they turn into a featureless white blob. Underexposed images, on the other hand, retain more detail in the shadows, which can often be brightened effectively in post-processing without significant loss of quality or introduction of excessive noise. As you adjust your aperture, shutter speed, and ISO, watch how the light meter reacts – it’s the direct visual feedback on your exposure decisions. Understanding its feedback is your first step towards masterful food photography and ensuring your delicious creations are perfectly lit.
1. Aperture: Controlling Light and Depth of Field for Food Photography

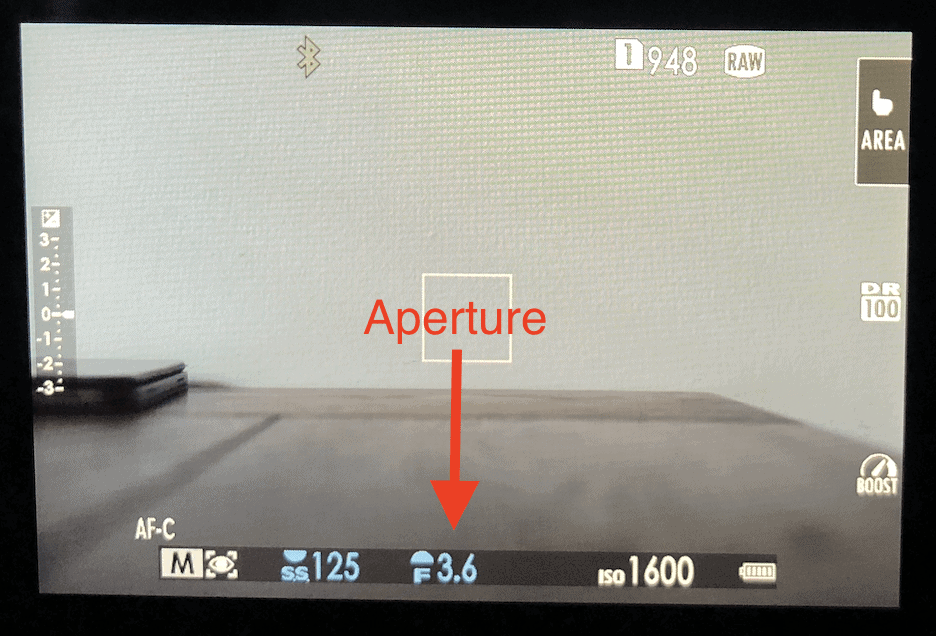
Aperture refers to the size of the opening in your camera lens that lets light through to the sensor. Think of it like the pupil of your eye: it dilates to let in more light in dim conditions and constricts in bright environments. A wider aperture (larger opening) allows more light to enter, increasing your image’s exposure and causing the light meter to move upwards. Conversely, a narrower aperture (smaller opening) lets in less light, decreasing exposure.
Aperture is measured in “f-stops,” displayed on your camera screen as “f/” followed by a number (e.g., f/3.6, as seen in the image above). This numerical system can be a bit counter-intuitive at first because it works inversely: a smaller f-number (like f/1.8 or f/2.8) signifies a wider lens opening, while a larger f-number (like f/8 or f/11) indicates a narrower lens opening. These f-numbers are fractions, based on complex optical ratios, but you don’t need a physics degree to master them for food photography.
What you absolutely do need to understand is how aperture profoundly influences your image’s depth of field (DoF). Depth of field refers to the range of distance in your photo that appears acceptably sharp. This is particularly crucial in food photography for creating that coveted “bokeh” effect – the beautiful, creamy blur in the background or foreground that makes your main dish pop. A wider aperture (smaller f-number) produces a shallower depth of field, meaning only a small portion of your image will be in sharp focus, while the rest melts into a pleasing blur. This is perfect for isolating a single hero dish and drawing the viewer’s eye directly to it.
For example, if you’re photographing a perfectly plated dessert, an aperture of f/2.8 or f/4 will give you a beautiful, creamy background, making the dessert stand out. This shallow DoF is ideal for emphasizing textures and details on your main subject. However, if you’re shooting a flat lay of multiple ingredients, a vibrant charcuterie board, or a whole tablescape where you want everything in sharp focus from front to back, you’ll need a narrower aperture, such as f/8 or f/11, to achieve a greater depth of field. Experimenting with aperture is one of the most creatively rewarding aspects of food photography, allowing you to guide your viewer’s gaze, control the narrative, and add artistic flair to your shots, making them truly irresistible.
2. Shutter Speed: Freezing Motion and Controlling Light

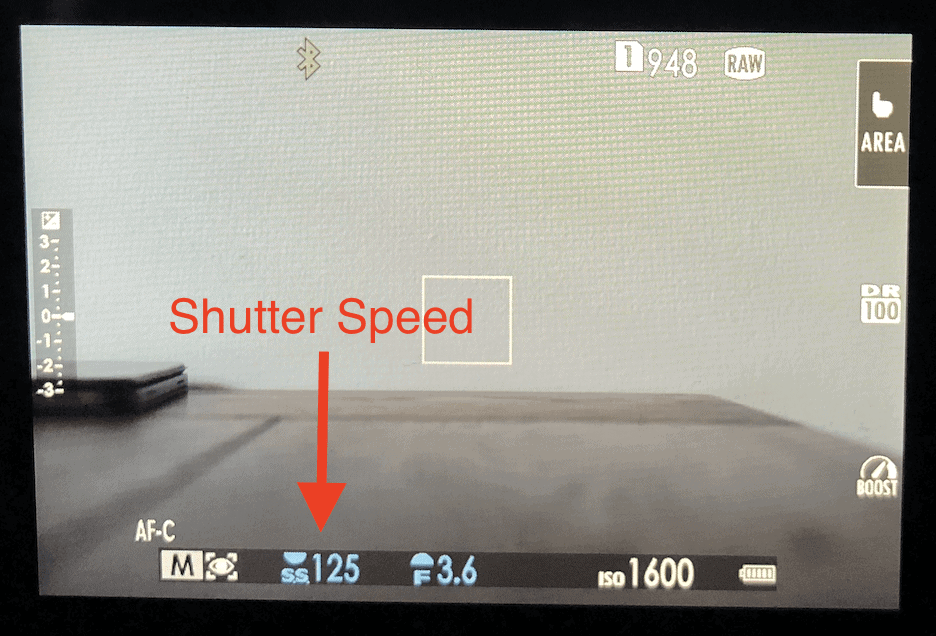
Shutter speed, quite literally, controls how long your camera’s shutter remains open, allowing light to hit the sensor. It’s measured in fractions of a second, as seen in the image above where the shutter speed is 1/125th of a second. A longer shutter speed (e.g., 1/30s) means the shutter stays open for a greater duration, letting in more light and increasing your exposure. Conversely, a shorter shutter speed (e.g., 1/500s) reduces the amount of light and darkens the exposure. Its primary role in food photography, beyond light control, is to manage motion and ensure sharpness.
The critical challenge with shutter speed is motion blur. If your shutter speed is too slow, even the slightest movement from your hand (camera shake) or the subject itself (subject blur) can result in a blurry image. For static food shots, a good rule of thumb when shooting handheld is to keep your shutter speed at 1/125th of a second or faster. Personally, I often shoot freehand because I love the flexibility of moving around to find the perfect angle. In these cases, I maintain a shutter speed between 1/125 and 1/250, which generally ensures crisp, sharp images even with slight hand movements.
However, there are creative instances in food photography where you might intentionally use a slower shutter speed. For capturing a captivating motion blur – perhaps of a sprinkle of sugar falling, a gentle wisp of steam rising from a hot dish, or the slow pour of syrup – you would need a slower shutter speed, and crucially, a tripod to keep the rest of your shot perfectly still. While less common in typical food blogging, action shots can add a dynamic element to your culinary storytelling. Think of capturing a delicate pour of sauce, a splash of milk into cereal, or the dramatic effect of powdered sugar dusting a cake. For these types of high-speed actions, you’ll want to *increase* your shutter speed significantly (e.g., 1/500s or even 1/1000s) to freeze the motion completely and capture every detail without blur. A tripod isn’t just for slow shutter speeds; it’s also invaluable for precise composition, consistent angles, ensuring level horizons, and even for capturing multiple shots for focus stacking or bracketing, ensuring your food subject is always presented in its best light.
3. ISO: Sensor Sensitivity and Image Noise

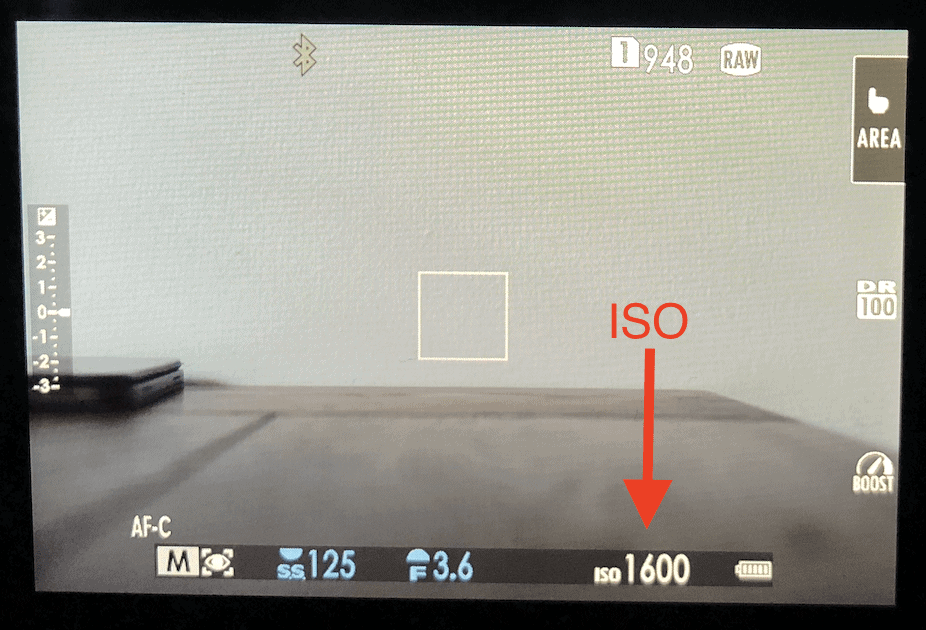
Of the three components of the Exposure Triangle, ISO often feels the most enigmatic to beginners. In essence, ISO measures your camera sensor’s sensitivity to light. Increasing your ISO boosts this sensitivity, making your camera “see” more light without physically altering the lens opening or shutter duration. This can be incredibly useful in low-light situations where you can’t open your aperture wider or slow your shutter speed further without introducing blur or undesirable depth of field.
However, this increased sensitivity comes at a cost: image noise. Higher ISO settings introduce digital grain, which manifests as tiny colored speckles or a general ‘grittiness’ in your photos, ultimately reducing image quality and making your food look less appealing. For this reason, my personal rule of thumb is to keep my ISO below 1600, or ideally, even lower. You always want to keep your ISO as low as possible to maintain pristine image quality and rich, accurate colors, making it the last resort in your exposure adjustment toolkit.
While ISO can certainly be used to brighten an image, it shouldn’t be your primary method for achieving proper exposure. Instead, prioritize adjusting aperture and shutter speed first, as these settings offer more creative control with fewer image quality compromises. In my food photography workflow, I typically keep my ISO within the range of 100-800, only extending it to 1600 if absolutely necessary in challenging low-light environments, like shooting in a dimly lit restaurant or on an overcast day without supplemental lighting. The main reason I adjust ISO at all is often to fine-tune exposure after I’ve already set my aperture for the desired depth of field and my shutter speed for sharpness. The best way to minimize the need for high ISO settings, and thus avoid noise, is to ensure you have ample and appropriate lighting – whether it’s bright natural light from a window or controlled artificial light setup. Proper lighting is truly the unsung hero that prevents you from having to compromise on image quality with a high ISO, ensuring your food photos are always vibrant and inviting.
Putting the Exposure Triangle Together: A Workflow for Food Photography
Now that we’ve explored each individual component, let’s bring the Aperture, Shutter Speed, and ISO together to form a cohesive strategy for your food photography! Understanding their interplay is crucial for consistently capturing stunning images.
Key Principles to Remember for Food Photography:
- Aperture (f-stop): This is often your starting point in food photography because it dictates your depth of field. Decide whether you want a creamy, blurred background (smaller f-number, e.g., f/2.8-f/4) to highlight a single dish, or a sharper, more detailed scene (larger f-number, e.g., f/8-f/11) for flat lays or full tablescapes. Remember, changing aperture also significantly impacts your exposure.
- Shutter Speed: After setting your aperture, adjust shutter speed to ensure a sharp image and to manage motion. For handheld shooting of static food, aim for 1/125th of a second or faster to prevent camera shake. If you’re going slower, especially for creative motion blur effects, a tripod becomes essential. For dynamic action shots like pouring or splashing, dramatically increase your shutter speed (e.g., 1/500s or 1/1000s) to freeze the action.
- ISO: Treat ISO as your last resort for adjusting exposure. Always strive to keep it as low as possible to minimize image noise and preserve clarity. Generally, avoid going above ISO 1600; ideally, keep it below 800 to ensure the highest quality. Only increase ISO if your aperture and shutter speed are set optimally for your creative vision and you still need more light.
A Practical Workflow for Food Photography in Manual Mode:
- Assess the Scene and Light: Before touching any settings, observe your light source (natural or artificial) and how it falls on your food. Good lighting is the foundation.
- Start with Aperture: Decide on your desired depth of field based on your composition and what element of the dish you want to emphasize. Set your f-number accordingly. Do you want a blurred background for a close-up hero shot, or do you need everything in focus for a flat lay?
- Adjust Shutter Speed: Next, set your shutter speed to ensure your image will be sharp. For static subjects and handheld shooting, 1/125s or faster is a safe bet. If using a tripod, you have more flexibility. If you’re capturing action, increase it significantly.
- Fine-tune with ISO: Once aperture and shutter speed are set, check your light meter. If your image is still too dark or too bright, make small adjustments to your ISO. Remember, lower is always better for image quality. Only increase ISO if absolutely necessary to achieve correct exposure, and always be mindful of the noise it introduces.
- Review and Repeat: Take a test shot. Review it on your camera’s screen, checking for exposure, sharpness, and focus. Adjust one setting at a time and reshoot until you achieve the perfect image.
| Aperture (f-stop) | Shutter Speed | ISO | |
| Primary Control | Depth of Field (DoF) & Focus | Motion & Sharpness | Sensor Sensitivity & Noise |
| Impact on Light | Wider (smaller f#) = More Light | Slower = More Light | Higher ISO = Brighter Image |
| Typical Food Photography Range/Advice | f/2.8 – f/11 (for varying DoF needs) | ≥ 1/125s (handheld), faster for action (1/500s+), slower with tripod for creative blur | 100 – 800 (ideally), max 1600 to avoid excessive noise |
The absolute best way to truly internalize how these settings interact is through hands-on practice. Grab your camera, prepare a delicious dish, and start shooting! Take a photo, adjust just one setting (e.g., your aperture), and then take the exact same photo again, trying to keep everything else constant. By doing this repeatedly, you’ll vividly see the direct impact of each adjustment on your image’s brightness, sharpness, and depth of field. This experiential learning is far more effective than simply reading about it. Hopefully, this detailed explanation of aperture, shutter speed, and ISO has illuminated their importance and empowered you to take greater control over your food photography, turning your culinary creations into visual masterpieces!
Don’t hesitate to reach out if you have any questions or need further clarification! I’m also thrilled to offer personalized guidance and elevate your food photography skills through a dedicated coaching call. Happy shooting!
